How to Mix and Edit Songs Together
Watch Weaver Beats’s tutorial above (74K views on YouTube).
This guide is for DJs blending two tracks live on decks, in software like VirtualDJ, Serato DJ Pro, or Traktor. If you can already load tracks but your live transitions still sound abrupt, muddy, or off-time, this fixes the core performance workflow. By the end you will be able to pick two tracks that blend, beatmatch them, set cue points, cue the next track in your headphones, and ride the crossfader for a clean handoff while the room keeps moving.
- Pick two tracks with close BPM and compatible keys.
- Beatmatch the incoming track to the one that is playing.
- Set a cue point where the new song should enter.
- Pre-listen the incoming track in your headphones.
- Start song B on beat at the cue point.
- Cut or reduce the low EQ on one deck to avoid mud.
- Use filter, volume, and the crossfader to finish the handoff.
That is the practical answer to how to mix two songs together live. The rest of this article shows why each move works on a live rig, what usually goes wrong mid-transition, and how to repeat the blend on purpose instead of by luck.
If you are building broader performance skills, it helps to pair this with a solid DJ set structure guide, a clear harmonic mixing basics article, and a practical beatmatching by ear tutorial. You do not need all of that to start, but each one removes a common failure point.
If you are not running decks at all and just want to stitch sections of two songs into one file on your phone, that is a different job. See how to put songs together to make one song for the free, no-gear iPhone workflow.
The visual way to organize your DJ library. Tag by vibe, export to any DJ app.
Live Two-Deck Setup
The setup stays simple. You need DJ software, two decks of tracks in a similar style, and somewhere quiet enough to hear your headphones over the master. VirtualDJ, Serato DJ Pro, and Traktor all give you the live tools that matter: cue points, channel EQ, filters, headphone cueing, and a crossfader.
Official documentation supports that baseline. Serato stores up to eight cue points per track, which is enough for most transition markers, and VirtualDJ's mixer controls include low EQ, filter, and crossfader functions that matter for this exact technique.
A controller is optional. You can mix live with a mouse and keyboard, but a controller makes timing easier because your hands move faster and more predictably when you are nudging a deck on beat. If you plan to play dim rooms or small venues, one hardware detail matters more than spec-sheet noise: a screen you can read fast and controls you can hit without looking. The real tradeoff is portability versus tactile control, not whether the unit has endless extras.
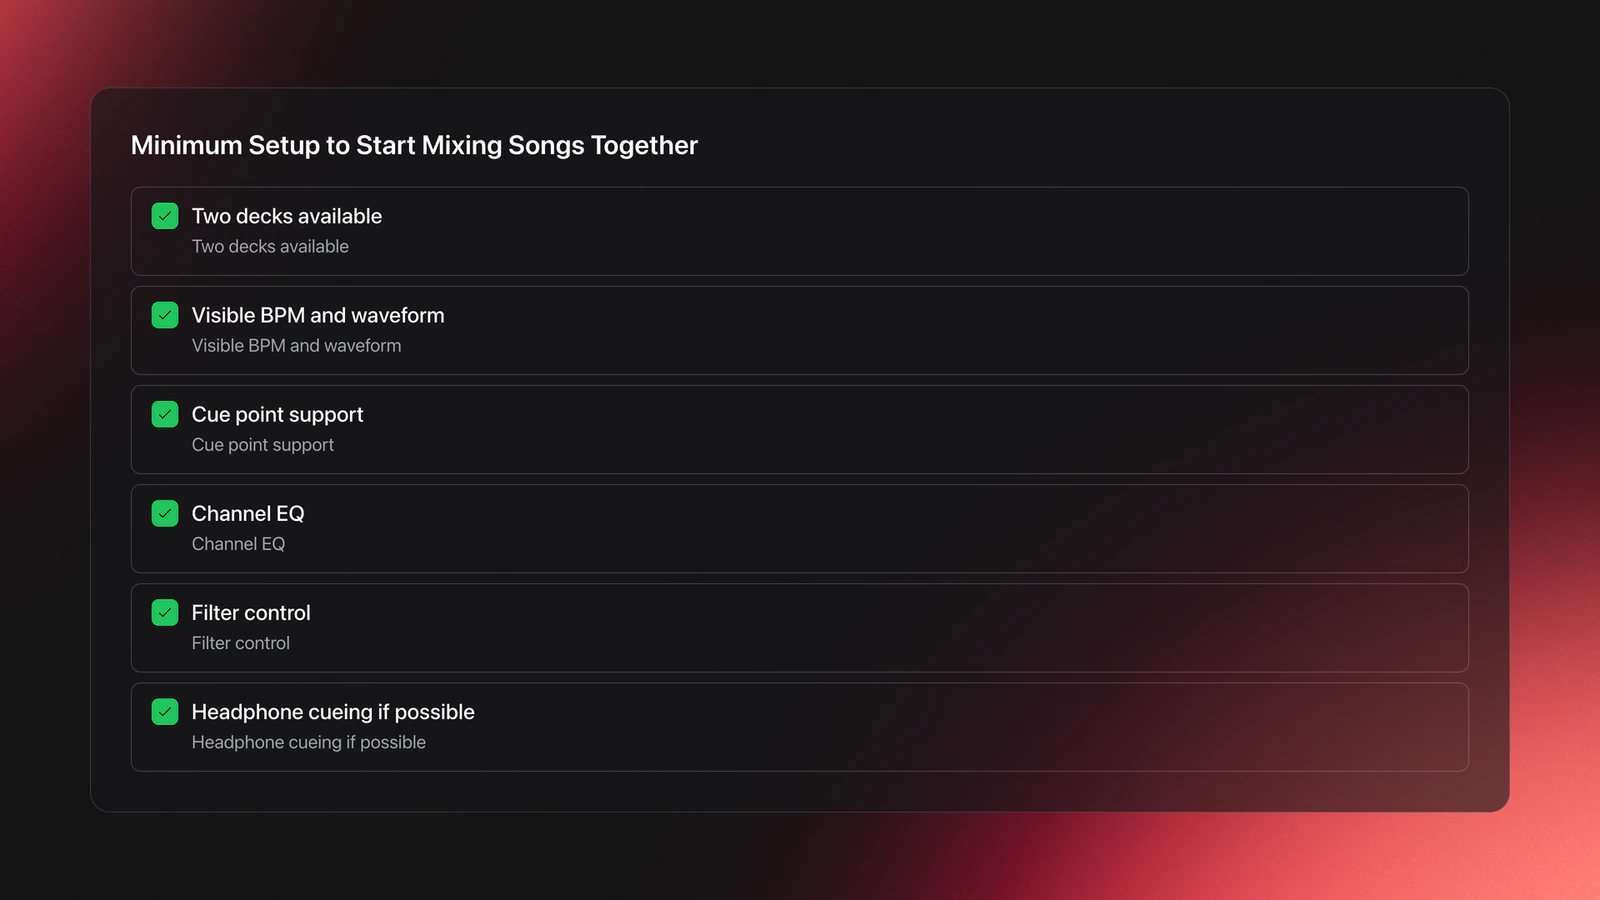
The minimum live checklist looks like this:
- Two decks
- Visible BPM and waveform
- Cue point support
- Channel EQ
- Filter control
- Headphone cueing so you can pre-listen the next track
Headphone cueing is the part that separates live mixing from offline editing. Before song B ever reaches the room, you should hear it in one ear, matched against the master in the other, so you can fix tempo and entry timing before the audience hears a single beat of it.
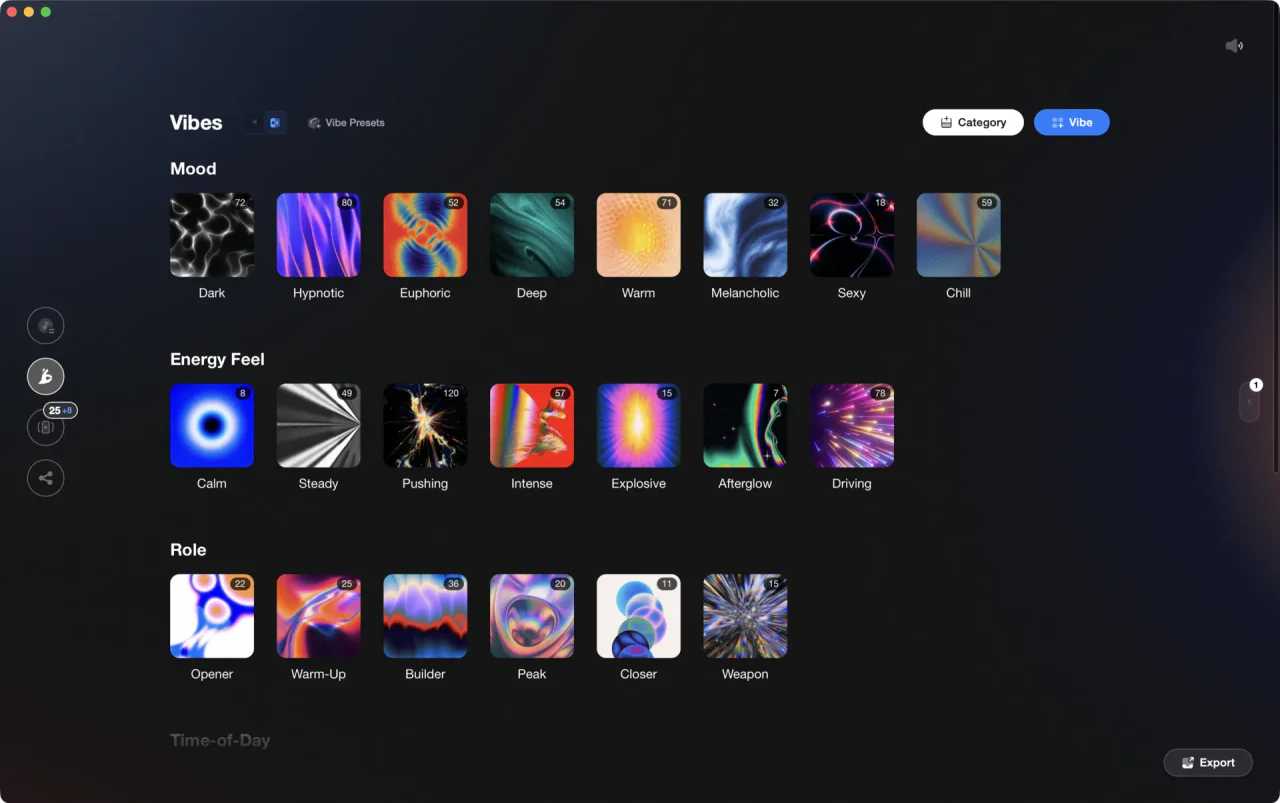
If your library is messy, the real problem is not mixing. It is finding a second track fast enough to cue it while the first one is still playing. Reduce search time with whatever prep you already trust: folders, tags, or notes grouping tracks by mood, function, or energy. A dedicated DJ library tool such as Vibes can pre-sort tracks by BPM, key, and energy so the compatible candidates surface together instead of you scrolling a flat list mid-transition. The goal is the same either way, which is to compare and cue candidates without dead air on the floor.
Choose Tracks That Can Actually Blend
Most bad live transitions are decided before you press play. If two songs fight in tempo, key, or arrangement, no amount of fader movement will save the mix once both are in the room.
The first filter is BPM compatibility. Start with songs that match exactly or sit close enough that a small tempo adjustment does not introduce obvious artifacts. Beginners should stay in a narrow range until beatmatching becomes automatic.
The second filter is key compatibility. Same key or a related key is the standard harmonic-mixing model. Mixed In Key's official harmonic mixing guide recommends mixing within the same Camelot key, one step up or down, or between relative major and minor pairs.
That gives you a simple decision frame, the blend triangle: tempo, key, and arrangement. If two sides are strong, you can usually solve the third live. If all three are weak, skip the pair.
Example one is easy. Track A is 130 BPM in 8A. Track B is 130 BPM in 8A. Both have clean eight-bar intros. You can beatmatch them, trigger on phrase, and likely get a usable blend fast.
Example two is workable, not perfect. Track A is 128 BPM in 8A. Track B is 130 BPM in 9A. The tempo gap is small and the keys are adjacent on the Camelot wheel. If the incoming track has a sparse intro, this can still sound clean live.
Example three is where beginners waste a set. Track A is 124 BPM in 8A. Track B is 138 BPM in 2B. Both open with full drums, bass, and lead. Even if you force the beatmatch, the arrangement is crowded and the keys are far apart. Move on.
Arrangement matters because songs are not written to overlap neatly. You make a live transition work by finding compatible moments, not by assuming the full tracks were designed as a pair.
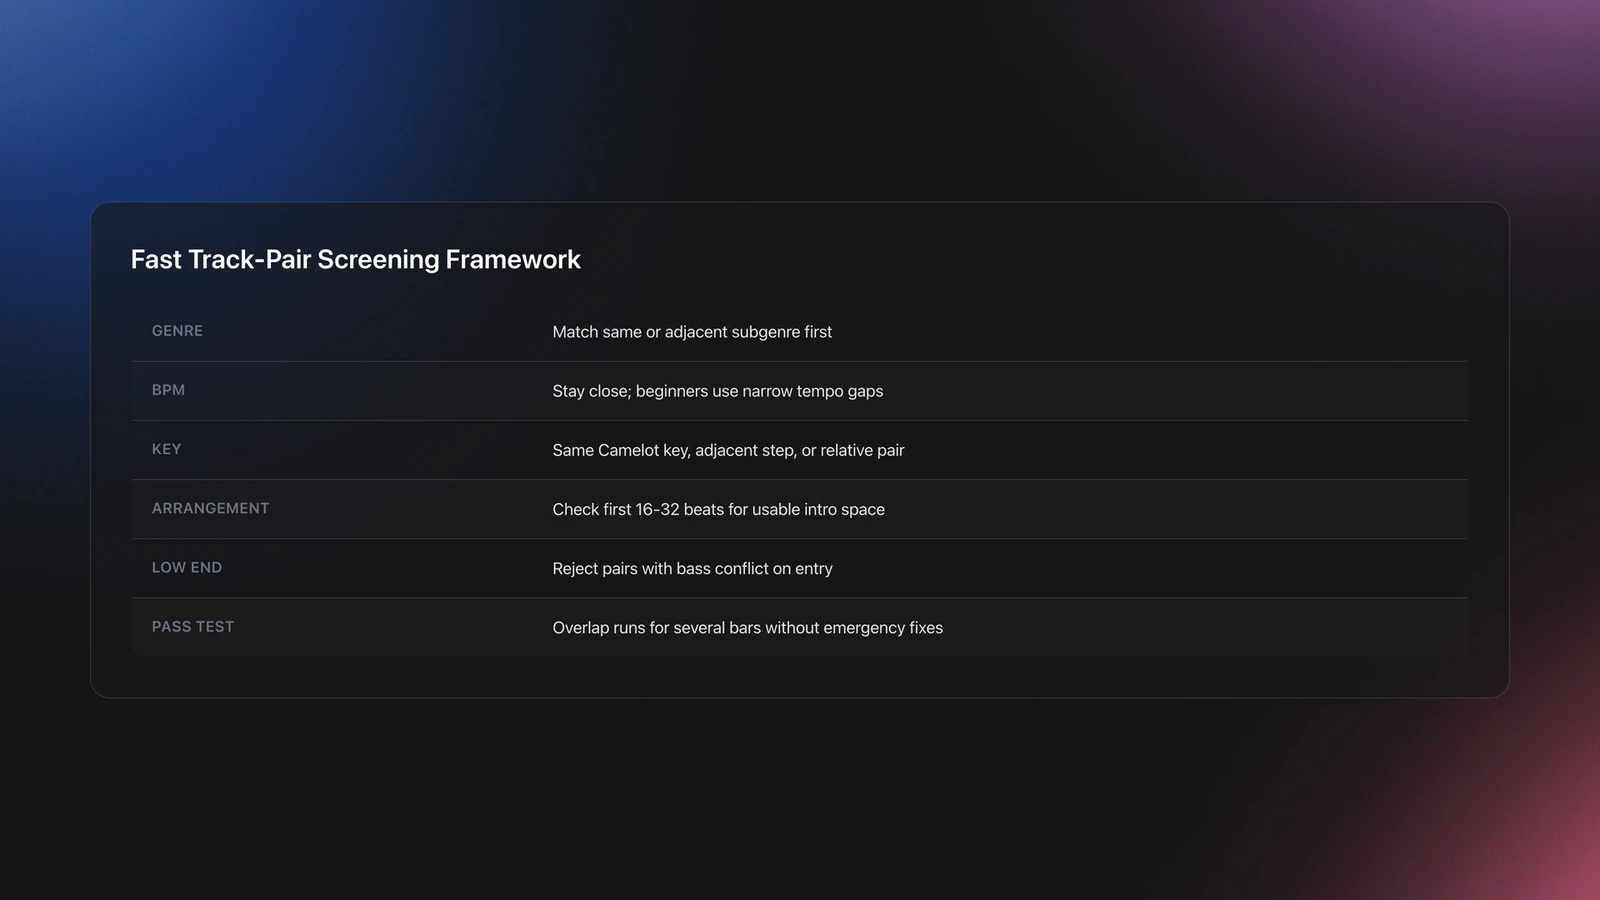
A fast way to screen candidates before they hit your queue:
- Match genre or adjacent subgenre first.
- Check BPM second.
- Check key third.
- Listen to the first 16 or 32 beats of each intro.
- Reject pairs with too much low-end overlap.
Failure mode: the tracks look compatible on paper, but the blend still sounds tense live. The usual symptom is clashing melodic content or a double-bass build right when song B enters. When that happens, trust your ears over the metadata.
Validation Check
Tip: pick five songs from one genre, sort them by BPM, then test each against a single anchor track for 60 seconds in your headphones. Keep only the pairs that survive tempo, key, and low-end overlap. You should end with two or three reliable options in under 15 minutes.
Set Cue Points for a Clean Entry
Cue points turn random guessing into repeatable live timing. A cue point is a marker that lets you return to the exact place where a track should start. Serato's official support documentation describes cue points as saved markers that can be triggered later, which is exactly why they matter on a live rig.
Use one cue point on song A to mark the handoff moment. When song A reaches that marker, you trigger song B from its own chosen entry point. That simple structure is enough for most live transitions.
Your first job is not to mark the start of the file. It is to mark the start of the usable phrase.
Example one: song A has a breakdown that ends after 16 beats, then the groove returns. Put your cue one phrase before that return if you want song B to arrive with the energy lift.
Example two: song B opens with four beats of silence, then a kick, then a synth line. Do not cue at absolute zero. Cue where the musical entry begins, or account for the silence before you trigger.
Some tracks have DJ-friendly intros. Others need an offset or a different insertion point. That is why you pre-listen in the headphones first.
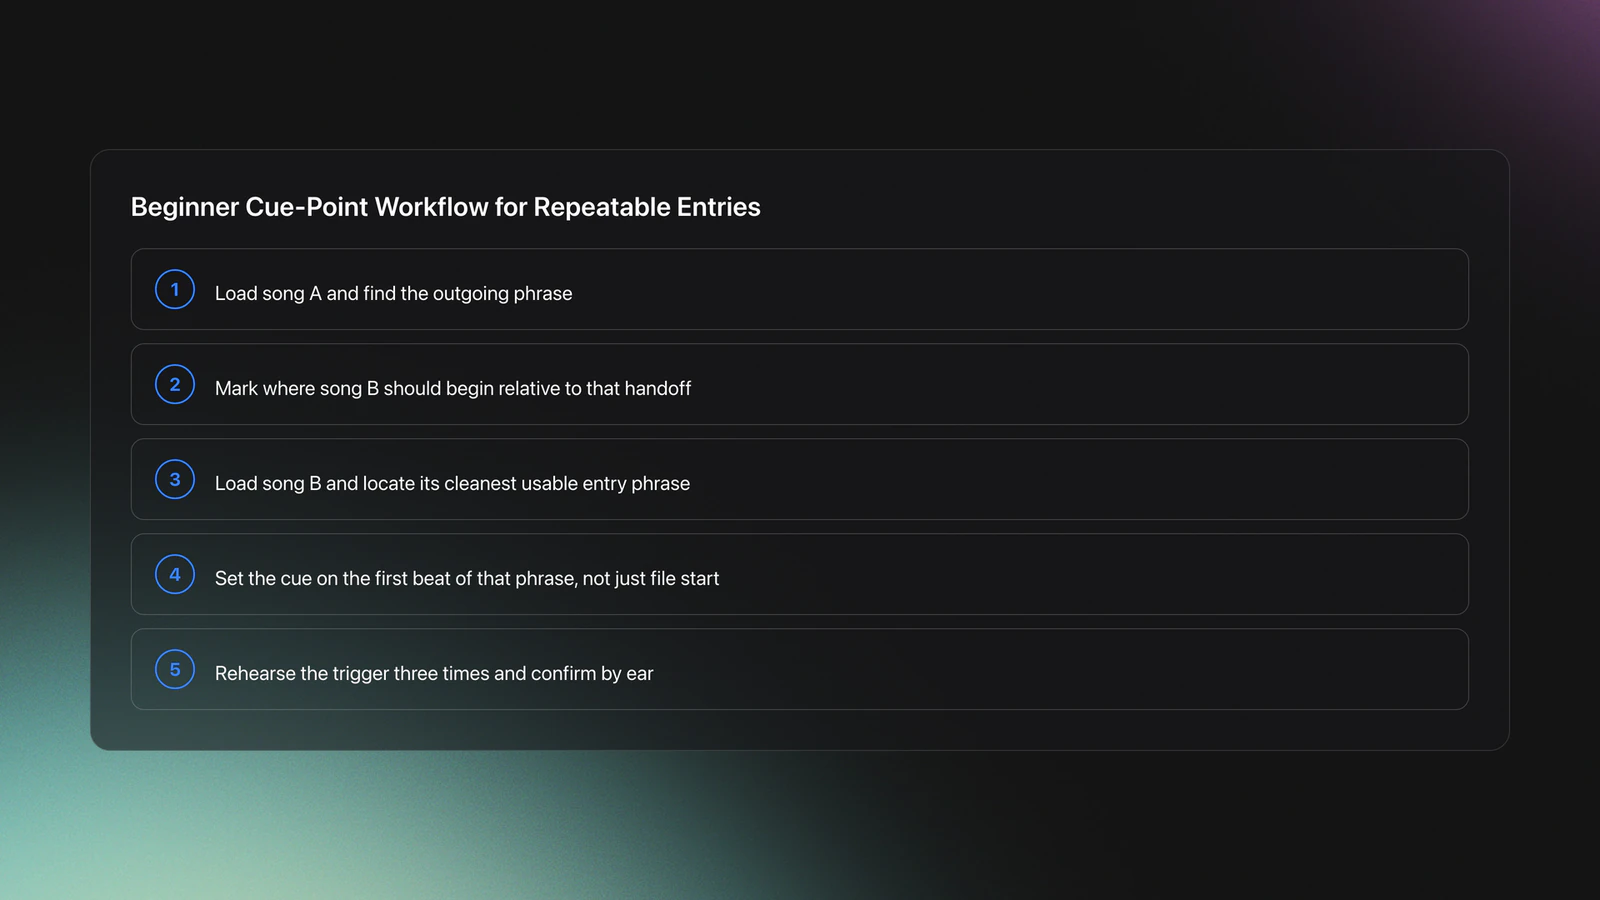
A reliable beginner workflow looks like this:
- Load song A and identify the outgoing phrase.
- Drop a cue point where song B should begin.
- Load song B and find its cleanest entry phrase.
- Set song B's cue point on the first beat of that phrase.
- Rehearse the trigger three times in your headphones before you take it to the master.
How do you combine two songs into one continuous mix on decks? You line up timing structures first, then audio. If the phrase lengths match, most of the transition becomes easier.
A common beginner mistake is setting cue points visually but not listening closely to transients. If the kick is late by even a small amount, the live blend feels unstable. Zoom in if needed, but confirm by ear.
If you manage a large library, pre-marking reliable entry points becomes its own prep job. Keep notes on which tracks have clean DJ intros and which need an offset, however you store that, so you can recall a fast second option mid-set. The point is having repeatable prep before you are under pressure on the floor.
You will know your cue setup is solid when you can trigger song B three times in a row and land in the same place with the same musical effect. Repeatability is the test.
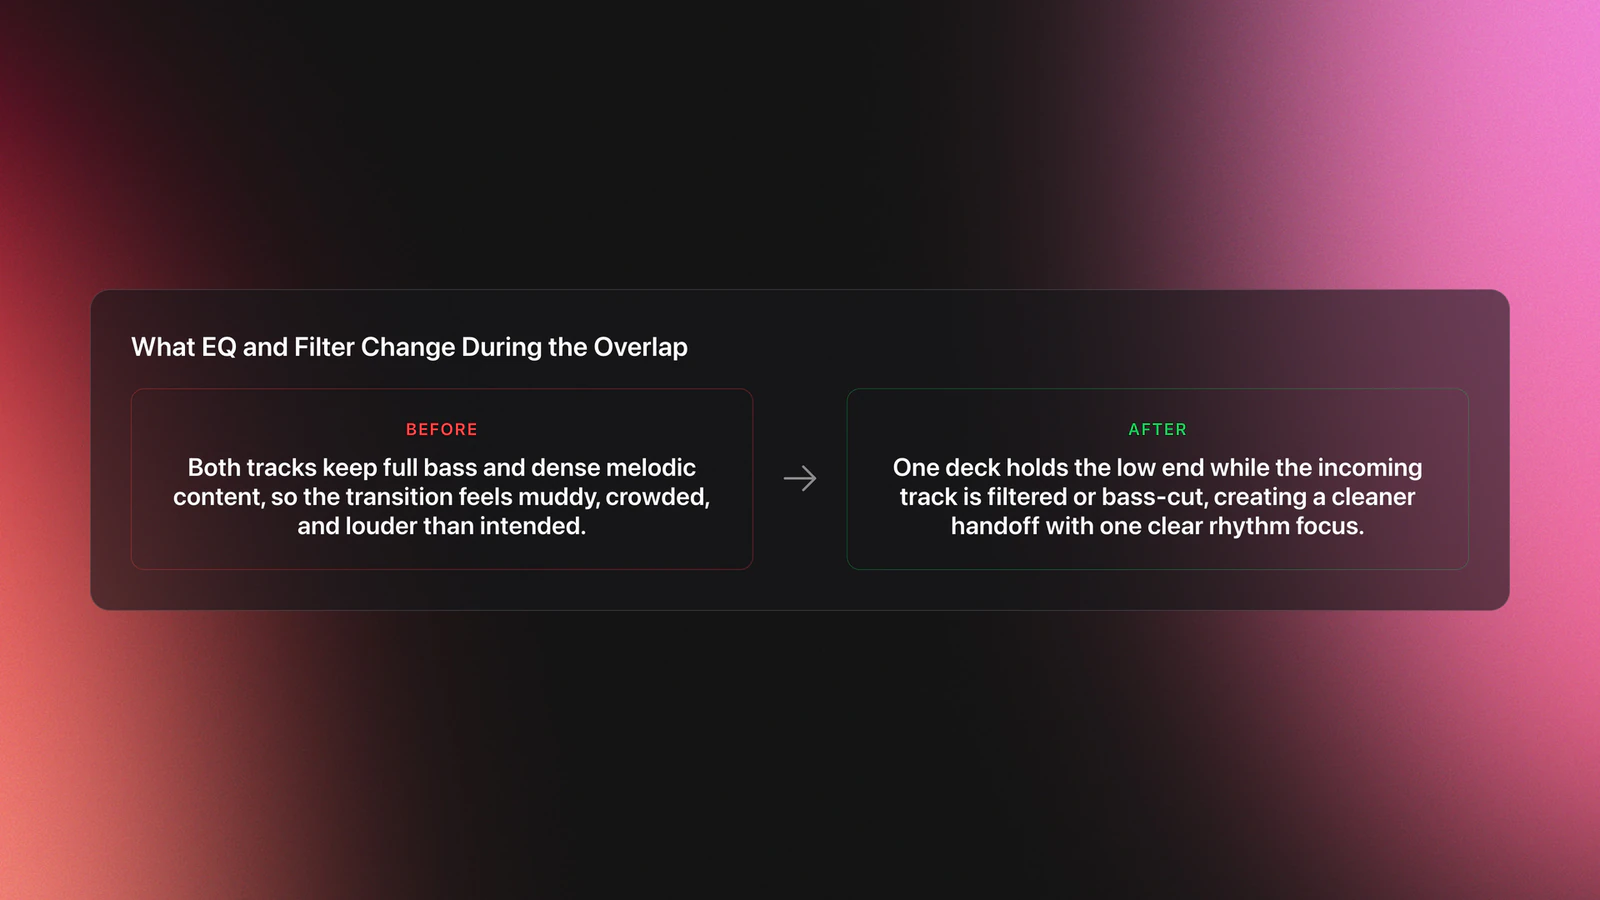
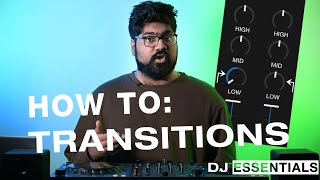
Blend the Transition With EQ and Filter
This is the section that makes the mix stop sounding like two songs piled on top of each other. When both tracks play at once, the biggest live problem is usually low-frequency collision.
If the overlap sounds too loud or muddy, start with EQ. Cut or reduce the low end on one deck, then listen again. VirtualDJ's user manual shows dedicated EQ and filter controls in the mixer section, and hardware layouts for supported controllers expose low EQ and filter as standard channel controls. This is a core mixer function, not an advanced trick.
Think of the overlap in layers:
- Low frequencies carry weight and punch.
- Mids carry vocals, synths, and groove detail.
- Highs carry hats, air, and edge.
If both tracks keep full bass at once, the mix bloats. If you remove too much from both, the transition loses force. Your goal is controlled overlap, not a hollow handoff.
Example one: song A is still driving the floor with a strong kick and bassline. Song B is entering with vocals and percussion. Keep song A's low end. Cut song B's lows until the handoff point. Then swap the bass emphasis as song B takes over and you push the crossfader across.
Example two: song B has a great vocal opening but too much full-spectrum energy. Apply a low-pass filter so mostly the upper content enters first. That buys you space before the full drop.
If a pair is close but not quite there, EQ and filter can rescue a live transition that would otherwise fail, but only if the underlying timing is already right.
Failure mode: the blend sounds technically aligned but emotionally messy. The symptom is a transition that feels crowded with no single focal point. Usually both tracks are carrying too much melodic information through the overlap.
The fix is usually one of three moves:
- Shorten the overlap window with a faster crossfader move.
- Filter the incoming track more aggressively.
- Choose a sparser entry phrase.
On decks, the smartest move is often to reveal only part of song B until the structure opens up, then bring the rest with the filter and crossfader.
You will know the EQ move is correct when the groove stays intact during the overlap. The room should still feel like it is hearing one coherent rhythm section, even though two tracks are active.
Handle Vocals and Match Deck Levels
Low-end collision is the loudest problem in a live blend, but it is not the only one. Two issues quietly wreck transitions that are otherwise beatmatched cleanly: two vocals fighting at once, and two decks playing at different levels.
Vocals clash worse than almost anything else. Two lead vocals over each other rarely sound intentional, because the ear tries to follow both lyrics at once and follows neither. The fix is timing, not volume. Bring the incoming vocal in during an instrumental or low-vocal stretch of the outgoing track, or hold the incoming vocal back with the channel fader and the mids until song A's vocal phrase has finished. If both tracks are vocal-heavy through the only usable overlap, that is a sign to pick a different entry phrase or a different track.
A simple rule for the overlap: let one track own the vocal at a time, the same way you let one track own the low end. If song A is still singing, keep song B's mids and vocal pulled down until there is room for it.
The second issue is level matching, and beginners miss it constantly. If one deck is noticeably louder than the other, the blend jumps in volume the moment you cross over, which reads as sloppy even when your timing is perfect. Use the channel gain or trim, the knob at the top of the channel, to balance the two decks before the transition, not the fader. Aim to have both tracks hit the meters at a similar level, peaking with headroom rather than pushing into the red. Tracks from different sources are often mastered at different loudness, so the same fader position does not mean the same volume.
A fast pre-transition check:
- Solo each deck and confirm both peak at a similar level on the meters.
- Nudge the quieter deck's gain up rather than slamming the fader.
- Keep the master out of the red so the overlap does not distort.
- Listen for which track has the louder vocal and plan around it.
You will know levels are matched when the crossover does not change how loud the room feels, only what it is hearing.
Work the Crossfader and Headphone Cue
The crossfader and the headphone cue are what make this a live performance rather than an offline arrangement.
Use the headphone cue to set up every transition before the audience hears it. Send the incoming deck to your headphones, beatmatch it against the master, confirm the cue point lands on the first beat of the phrase, then take it to the room only when it is locked.
Use the crossfader to shape the handoff:
- A slow fade across several bars suits two grooves that already share texture.
- A quick cut suits a hard switch, often paired with a filtered or EQ-cut entry.
- A mid-speed move with a low-EQ swap suits most bass-led transitions.
A useful mental model for live decisions is lead with one low end at a time. Whichever track owns the bass owns the room. Decide which deck leads the bottom end through the overlap, and use EQ plus the crossfader to hand it over once.
I play most of my sets back to back, usually 1.5 to 2 hours, and that is where this becomes second nature. Blending live next to another DJ forces you to read the room in real time and choose the next track on the fly, not from a fixed plan, and the headphone cue is what buys you the seconds to make that call cleanly.
Can ChatGPT mix two songs together for you live? Not in the way a DJ means here. An AI tool can explain process or help you write prep notes, but it cannot hear your room, judge crowd energy, or make the real-time timing, headphone-cue, and EQ decisions that turn two specific tracks into a convincing live transition.
If you want cleaner results, fade less and listen more. Most beginners over-handle live transitions because they do not trust a simple, well-timed entry.
Practice the Mix Until It Repeats
A live transition is not learned when it works once. It is learned when you can reproduce it on demand.
Start with one pair of tracks. Do not rotate through ten songs in a session. That spreads your attention too thin and hides what is actually improving.
Use this short routine:
- Minutes 0-10: beatmatch, set cue points, confirm BPM and key.
- Minutes 10-20: practice the raw trigger and crossfader move with no EQ.
- Minutes 20-30: add the low-cut and filter decisions.
In week one keep the overlap short. In week two extend it and test whether your EQ timing still holds. In week three swap song B for a different compatible track and repeat the same process.
You can measure progress with three signals:
- You trigger the second track on beat more often than not.
- You hear low-end conflict sooner.
- You can explain why a blend works or fails.
That last one matters most. If you can name the failure, you can fix it.
Common Mistakes When You Mix Two Songs Live
| Mistake | Why It Happens | How to Avoid |
|---|---|---|
| Choosing tracks with incompatible BPM and key | The pair looked close enough, but the groove and harmony fight each other | Screen by genre, BPM, and key before testing the blend |
| Setting cue points at the wrong musical moment | The visual waveform looked right, but the phrase starts later | Cue the usable phrase, then confirm by ear three times |
| Leaving full bass on both tracks | Beginners focus on timing and forget frequency overlap | Cut lows on one deck during the overlap |
| Trying to force a long transition | The songs are only partly compatible | Shorten the overlap and use a simpler handoff |
| Practicing too many song pairs at once | There is no repeatable baseline for improvement | Stay with one track pair until the transition is consistent |
Most transition problems come from track selection, phrase timing, or low-end overlap.
Build a Reliable Live Mixing Workflow
Once you can run one clean transition, scale the process instead of improvising from zero each set. Keep candidate tracks grouped by role. Keep notes on which pairs work. Keep a short list of safe openers, safe handoffs, and high-energy entries.
That is why library structure affects mixing quality. If you spend too long searching mid-set, you stop making musical decisions and start making rushed ones. A structured prep routine, whether it lives in folders, spreadsheets, or notes, keeps your transition choices musical under pressure.
From there, expand carefully. First build three reliable pairs. Then chain four or five tracks. Then test whether the energy curve still makes sense across the whole mini-set.
If you also want a broader music library organization system, a practical DJ playlist workflow, and a deeper phrase mixing tutorial, those are the next useful layers once basic two-song blending feels stable.
Conclusion
The core skill behind how to mix two songs together live is not fancy software. It is controlled decision-making in real time. Pick tracks that can coexist, mark the right entry points, cue in your headphones, and manage the overlap so only one low end leads at a time.
Keep these takeaways in mind:
- Track choice solves more problems than mixer tricks.
- Cue points and headphone cueing make timing repeatable.
- EQ, filter, and the crossfader create space during the overlap.
Start with one strong pair of songs and make that live transition boringly reliable. Once it repeats on command, build outward.
The visual way to organize your DJ library
Tag tracks by vibe. See everything at once. Export to any DJ software.
A visual system for organizing your DJ library.
Techniques Covered
Seamless Song Transition

Low Pass Filtering
Mixing in Key (Camelot Reference)

Transition Technique

Harmonic Mixing for DJs: A Complete Guide
Phrase Mixing
Crossfading
Precision Blend Technique
Beat Matching
Auto BPM Transitions Across Genres
Track Selection

Library Optimization
Crossfader Use
Bass Shift Transition
Camelot Wheel Guide for DJs
Key Analysis
Stem Separation

DJ System Configuration
Equipment & Software
Official Manuals
Documentation
Continue Your Learning Journey
Start Here First
Related Content
DJ Transitions: The Three-Layer Handoff for Beginners
intermediate
Mix and Key: Practical Guide to Melodic DJ Mixing
intermediateHow To Mix In Key Live: Worked Transitions And Failure Fixes
intermediate
When Mix and Key Actually Matters: A DJ's Guide to Harmonic Decisions
beginnerHarmonic Mixing Guide for DJs: Energy & Workflow
intermediateCamelot Wheel DJ: Layered Deck Mixing With EQ and Phrase
intermediate
DJ Setup Guide: Wire a Reliable Rig From Bedroom to Club
intermediateFrequently Asked Questions

Hey, it's Ben Modigell 👋
I DJ and produce as so I so — downtempo, minimal, dub house, tech house, and techno (releases on Spotify and SoundCloud, links above). Everything I write here comes from my own gigs, studio sessions, and library cleanups: the rules I follow, the failure modes I've actually hit, and the workflow I use when nobody's watching. If a technique didn't earn its place in my own sets, it doesn't make it into a tutorial.