How to Set Up Your First DJ Controller and Mix Two Tracks
Watch Thozi’s tutorial above (1.4M views on YouTube).
This is for new DJs ready to buy their first rig. You know you need hardware but feel lost between controllers, speakers, and software. After reading, you'll know exactly which dj starter equipment to get, how to wire it, and how to make your first clean transition.
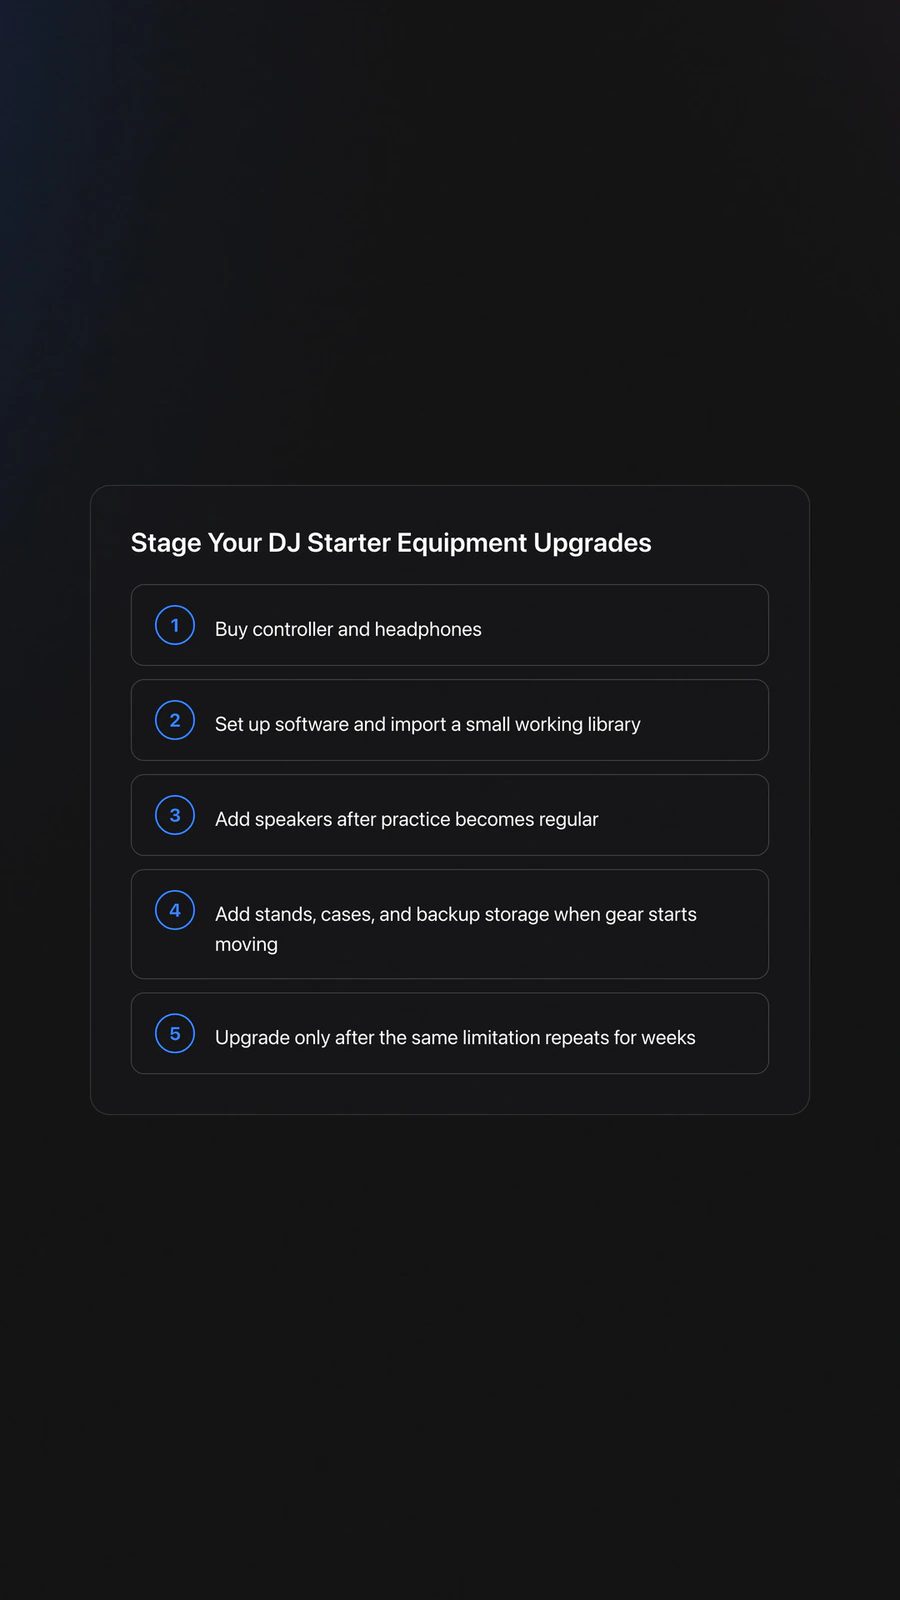
You do not need a studio. You need a reliable signal path, sensible monitoring, and a library you can navigate fast. Start simple. Add only when the bottleneck moves.
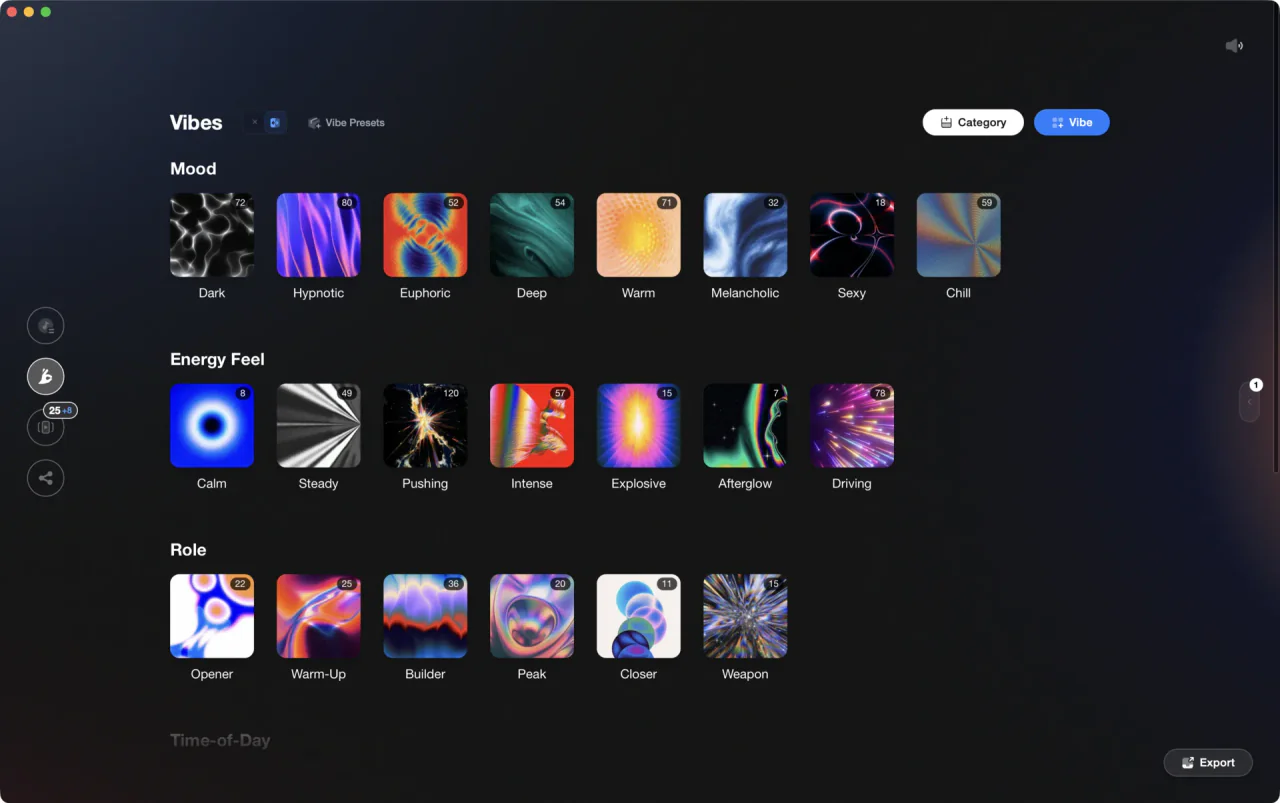
The visual way to organize your DJ library. Tag by vibe, export to any DJ app.
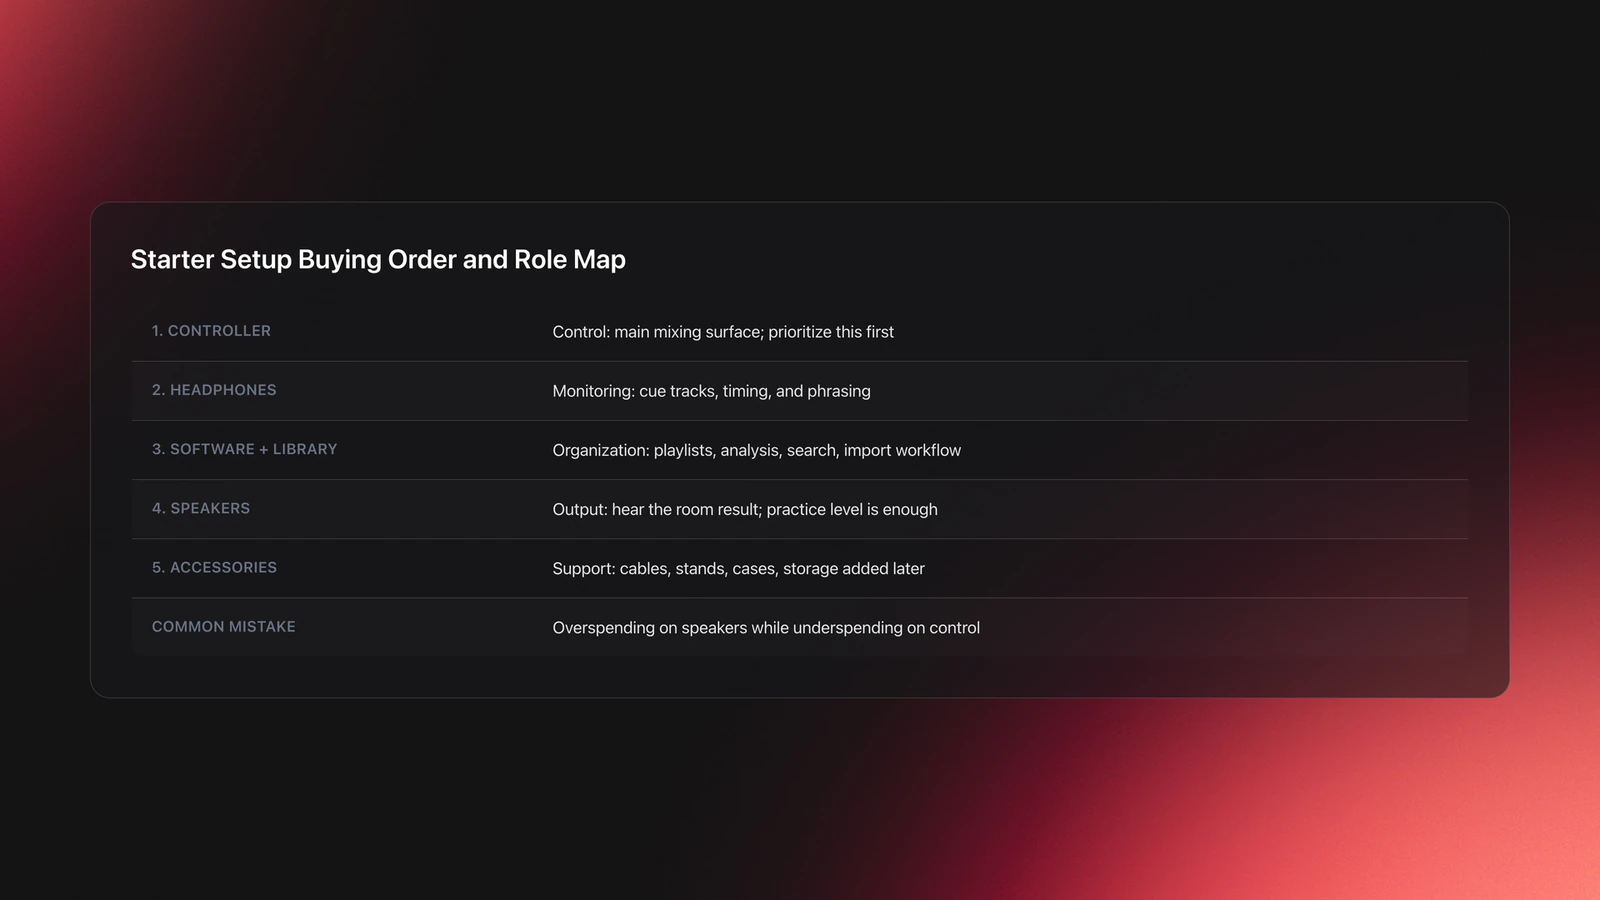
Core DJ Starter Equipment Checklist
A basic dj setup has five parts: source, mixer section, headphones, monitoring, and computer/software.
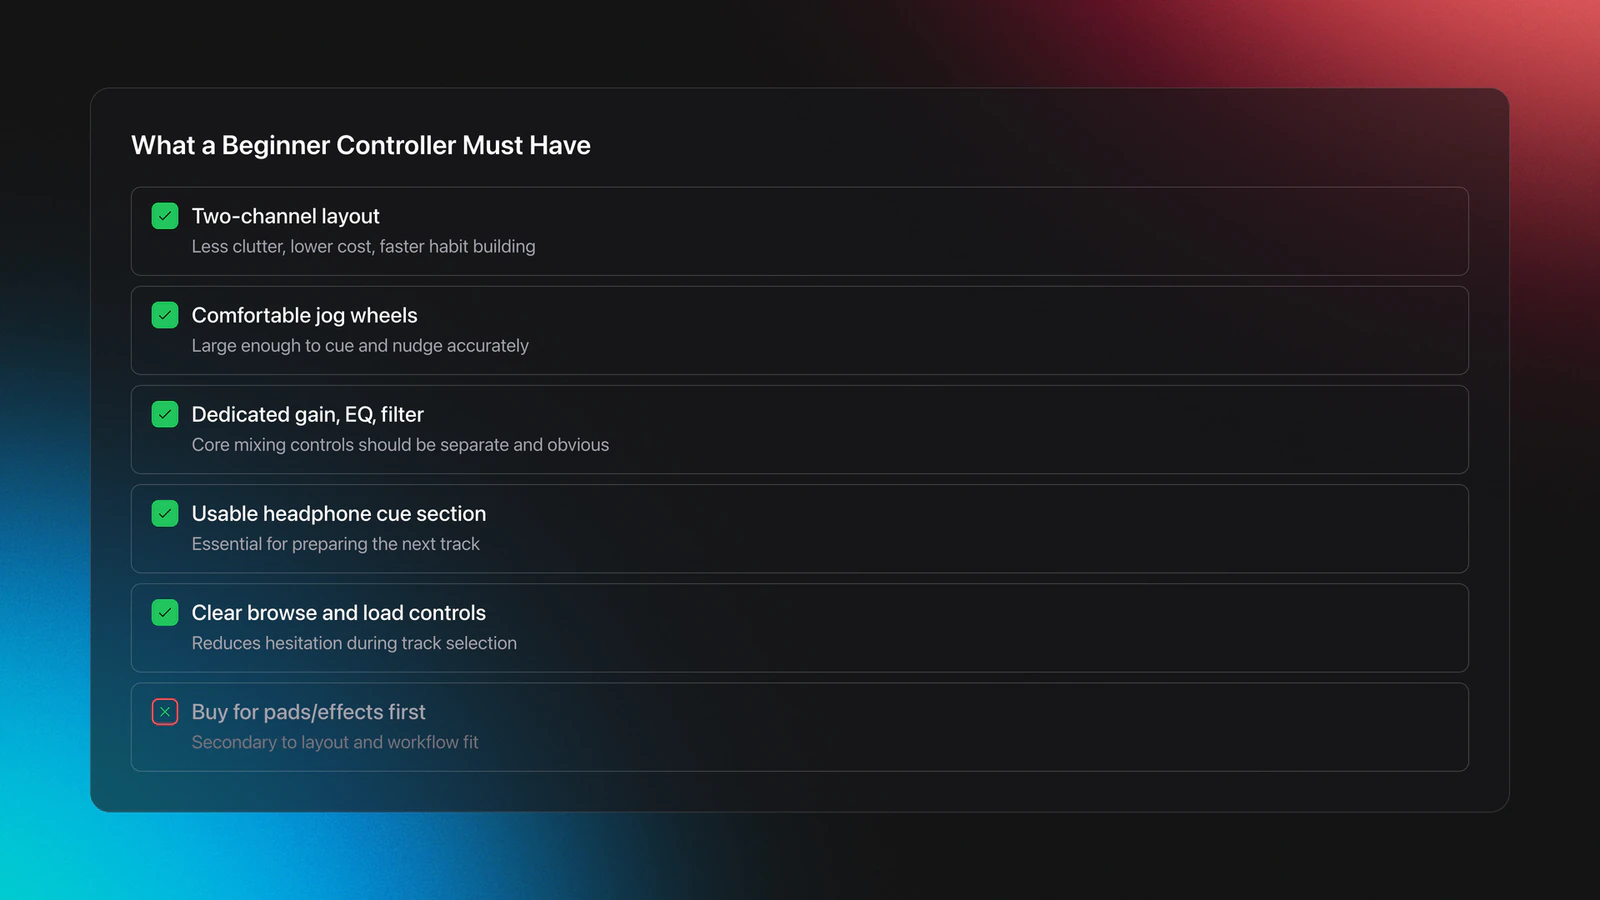
- Two-channel DJ controller with built-in audio interface.
- Laptop running current DJ software.
- Closed-back, isolating DJ headphones.
- Powered speakers or quality studio monitors.
- Cables: USB for controller, balanced TRS/XLR to speakers, and power.
A 2-channel controller covers 95% of beginner use. It combines decks and mixer, reduces mess, and keeps your hands where they should be.
Look for a controller that is bus-powered, class-compliant, and supports the software you plan to use. Built-in sound card simplifies cabling and headphone cueing.
Example reference: Pioneer DJ's DDJ-FLX4 is a two-channel controller with a built-in sound card and USB bus power. It supports popular DJ apps across desktop and mobile. Always confirm software compatibility for your OS version.
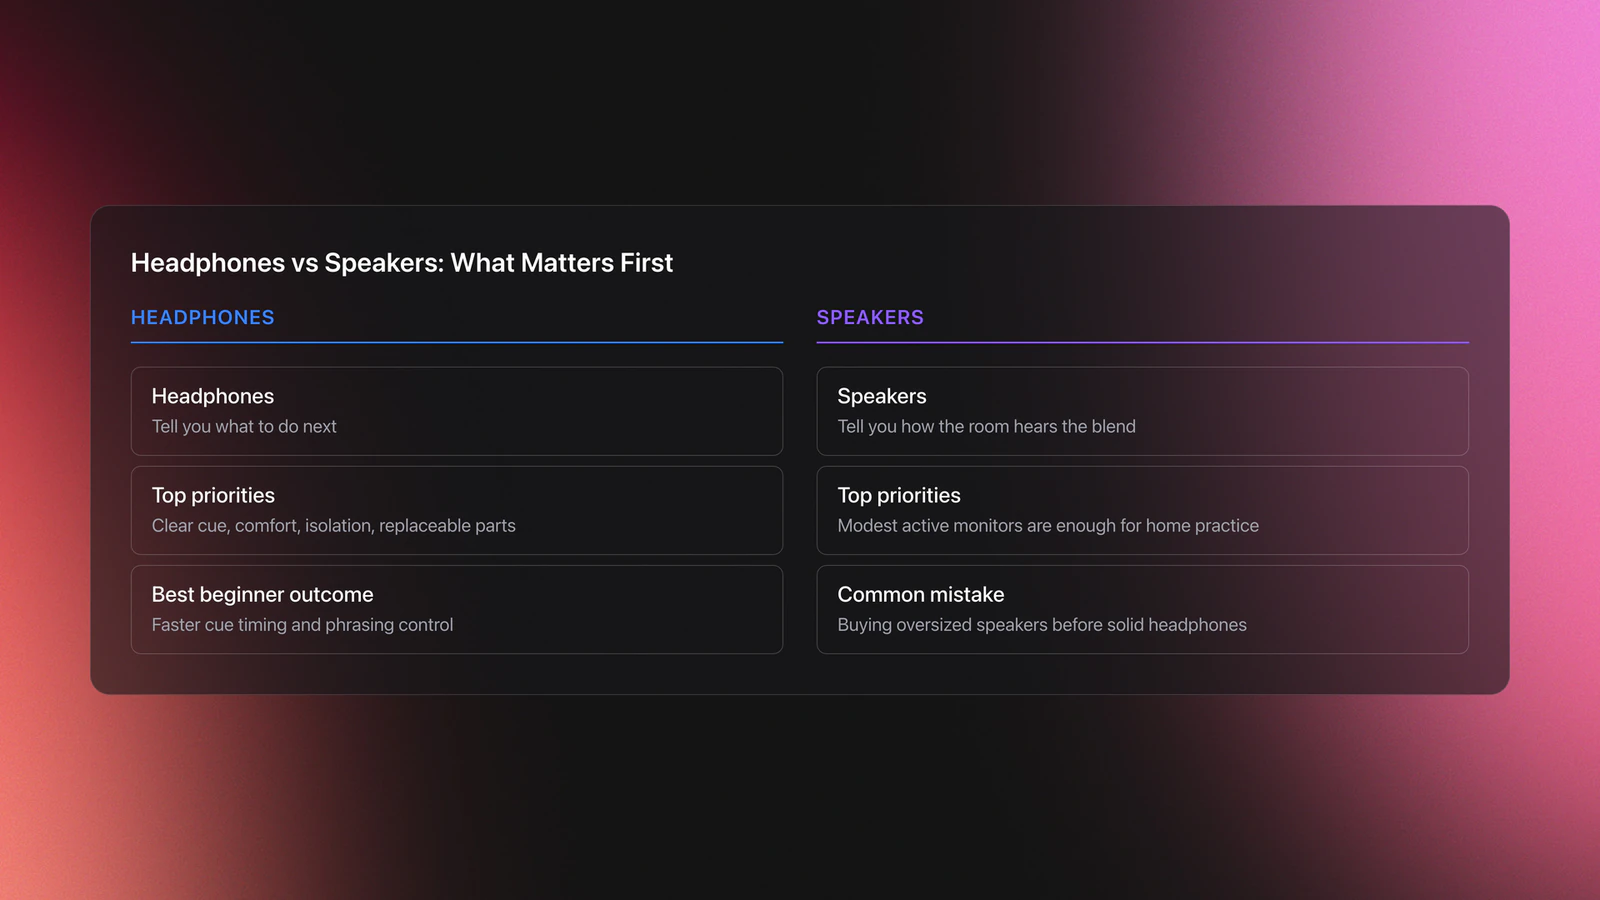
Headphones matter more than many think. Prioritize clamp force and isolation over brand lore. You need to hear kick and hats clearly while booth speakers are running. DJ headphones with swivel cups let you monitor with one ear while hearing the room with the other.
For speakers, powered nearfields are fine at home. Place them at ear height, pointed at you, not the neighbors. Keep gains conservative and let the room breathe. If your space or budget doesn't allow monitor speakers, start with headphones only, you can add speakers later.
Optional now, later maybe: an external USB hub with power, a laptop stand, and short balanced cables to avoid ground loops. For vinyl setups, you'll also need RCA cables and possibly a phono preamp if your mixer lacks a phono stage.
DJ Setup Types: Which Path Fits You?
Before buying, understand the main DJ setup categories. Each has trade-offs in cost, portability, and workflow.
Controller Setup (Recommended for Beginners)
The all-in-one path. A DJ controller combines decks, mixer, and audio interface in one unit. Connect it to a laptop running DJ software like Serato DJ Pro, Rekordbox, or Traktor. This is the fastest route from zero to mixing. Controllers offer tactile control for music manipulation, portable sizing, and software sync features that accelerate learning. You can customize controller setup mappings in most DJ software to match your workflow. Most beginners should start here.
Computer-Only DJ Setup
The minimal path. An all computer dj setup requires just a laptop and DJ software, no controller required. Use keyboard shortcuts or mouse to trigger cues, adjust EQ, and blend tracks. This setup costs nothing beyond the software (some apps are free). It's slower and less tactile than a controller, but works for learning song structure, phrasing, and basic transitions. You may want an audio interface for better sound quality and separate headphone output. Upgrade to a controller when you want fader precision and jog control.
Turntable DJ Setup
The vinyl path. Two direct drive turntables, a DJ mixer with phono inputs, cartridges, slipmats, and a collection of vinyl records. This is how DJing started. Turntables teach pitch control and manual beatmatching without visual waveforms. The gear costs more, takes up space, and vinyl is heavy. Most beginners skip this unless they specifically want to scratch or collect records.
Components for a turntable setup: direct drive turntables, DJ mixer, phono preamp (if mixer lacks phono stage), DJ cartridges and needles, slipmats, monitor speakers, DJ headphones, and isolation feet for vibration control.
Turntable + DJ Software Setup (DVS)
The hybrid path. Connect DJ turntables to a computer via an audio interface running a DVS system (Digital Vinyl System) like Serato Scratch Live or Traktor Scratch. You manipulate digital files with real vinyl, timecoded DJ software control vinyl sends position data to the software. This gives the tactile feel of vinyl with the convenience of a digital library.
A complete turntable setup with DJ software requires: DJ turntables, DJ mixer with USB or a separate computer DJ interface package, DVS-compatible audio interface (such as Rane Sixty-Two for Serato or Native Instruments Traktor Audio 2 for Traktor), DJ software control vinyl, DJ cartridges, DJ headphones, slipmats, USB cable, and RCA cables. The DJ mixer routes your turntable signal through the interface to the software, which reads the timecode and plays your digital files in response.
This is intermediate territory, learn on a controller first, then add turntables when you want vinyl feel with your digital library.
CDJ Setup
The club-standard path. A CDJ DJ setup uses standalone media players found in most professional DJ booths. Modern CDJs read USB drives containing digital files and can link to laptops. A CDJ setup includes two CDJ units and a standalone DJ mixer. No laptop required for basic playback, export your library to USB using Rekordbox. Some older CDJs still play CDs. CDJs are expensive and designed for club installation. Most beginners practice at home on controllers and learn CDJ workflow later for club gigs.
CDJ + DJ Software Setup
CDJs can also connect to laptops via HID mode, letting you use CDJ hardware to control DJ software like Rekordbox or Serato. The CDJs become large, high-quality controllers for your digital files. This hybrid approach is useful when you want the club-standard feel at home or need software features alongside CDJ playback.
Ableton Live DJ Setup
The producer-DJ path. Some DJs use Ableton Live instead of traditional DJ software. Ableton treats tracks as clips in a session view, allowing nonlinear arrangement, live remixing, and deep effects processing. An Ableton Live DJ setup typically includes: laptop, Ableton Live software, an audio interface, and an Ableton software controller like Push or a Novation Launchpad.
This workflow differs from deck-based mixing, you launch clips, layer loops, and build DJ sets in real time with full control over effects and track setup. Best for DJs who also produce or want maximum creative flexibility. Steeper learning curve than traditional DJ software.
Which Setup Should You Choose?
| If you want... | Choose |
|---|---|
| Fastest path to mixing | Controller + laptop |
| Zero cost to start | Computer-only (laptop + free software) |
| Vinyl feel, manual skills | Turntables |
| Digital library + vinyl control | Turntables + DVS |
| Club-standard workflow | CDJ + mixer |
| Live remixing, production crossover | Ableton Live setup |
Most readers of this guide should start with a controller. It's the best balance of cost, learning speed, and transferable skills.
Beginner DJ Setup: Wiring And Configuration
Keep signal flow linear: Laptop to Controller to Speakers. Headphones plug into the controller for cueing.
- Connect the controller to your laptop using the supplied USB cable. Prefer a direct port over a flaky hub.
- Power your speakers off. Connect controller master outputs to speakers using balanced cables where possible.
- Plug headphones into the controller's headphone jack. Set their volume to minimum.
- Launch your DJ software. Select the controller as the audio device. Set Master to the controller's main out and Headphones to the controller's cue out.
- Set trim, EQ, and filters to neutral. Faders down. Master around 10 to 11 o'clock to start.
Set your software buffer high enough to avoid pops. Drop it later if latency bothers you. Stability first. In practice, start the buffer around 256 or 512 samples. If you hear pops, clicks, or crackle, raise it; if the controls feel laggy and the audio is clean, lower it toward 128. Lower buffer means lower latency but more CPU strain, so find the balance your laptop holds steadily.
If you get no sound at all, work the routing before the cables. Confirm the controller is selected as the audio device, that Master is assigned to its main out and Headphones to its cue out, and that channel faders and master are actually up. A direct USB port beats an unpowered hub, and closing browsers and background apps frees the CPU the audio engine needs.
Cue workflow: enable the headphone cue on the silent deck, set the cue/mix knob to cue, and adjust headphone level until you can hear transients without strain.
Validation signal: with channel faders down and cue enabled, you hear music only in headphones. Audience hears nothing. If they do, your routing is wrong.
Worked example A: Controller to powered monitors. USB from laptop to controller. Two XLR cables from controller master out to monitors. Headphones into controller. That's it.
Worked example B: Small room, no speakers. Use headphones only while learning phrasing and beatmatching. Keep master muted. This saves hearing and neighbor goodwill.
Failure mode: monitoring bleed. Symptom: your headphones need to be uncomfortably loud to hear the cue. Fix: move speakers farther apart, reduce room volume, and use more isolating headphones.
Organize Music First: Playlists Before Purchases
Gear is nothing without a navigable library. Build playlists by energy, mood, and function so you can grab the next track under pressure.
Method: define a small set of categories, keep names literal, and test your bins during short practice mixes. Delete or merge categories that you never use.
You can create hierarchical folders and playlists in your DJ software. Or use a dedicated organizer to build a transferable structure you can export into performance tools; Vibes is built for this, letting you sort your first library by energy, mood, and function and carry that structure straight into your DJ software.
Validation signal: you can find three compatible tracks for any playing tune in under 15 seconds. If not, simplify your bins or add missing metadata.
Your First Transition On A Basic DJ Set
Your job is to play tracks in series so they feel like one continuous record. Beatmatching and level control make that happen.
Load Track 1 on Deck A. Set channel fader up. Master at a safe level. Load Track 2 on Deck B with fader down. Enable cue on B.
Match tempos with the tempo fader. Bring the BPMs within a few tenths. Ignore the decimal fetish. Get close. Use your ears.
Start Track 2 in your headphones at a musical phrase boundary. If it drifts behind, nudge the jog wheel forward briefly. If it runs ahead, nudge backward. These nudges are temporary. The tempo fader is permanent.
What a phrase boundary means: most dance tracks group beats into 4-bar and 8-bar units, with a standard phrase running 8 bars, or 32 beats. Count beats in fours and bars in eights, and bring the new track in at the start of a phrase, usually right after a breakdown or where a new section enters. Aligning the kicks but ignoring phrasing causes a "phrase wreck," where the beats match but the song sections clash and the floor feels the awkwardness even if it cannot name it.
When kicks align for eight bars without correction, you're ready to blend. Lower Deck B's low EQ slightly. Bring B's fader up slowly over 8 to 16 bars. Then bring A down. Restore B's low EQ. Done.
Worked example 1: Track 1 at 120 BPM, Track 2 at 122 BPM. Set both to 121. Start on bar 1 of a 16-bar phrase. Jog nudge every few beats until hats stay locked.
Worked example 2: Track 1 at 100 BPM, Track 2 at 104 BPM. Meeting in the middle may sound strained. Keep the range within about plus or minus 5 BPM. If it sounds unnatural, choose a different pairing.
Failure mode: the "horses" effect. Symptom: chaotic flamming and galloping when two downbeats land out of time. Fix: stop the mix, realign BPMs, and re-enter on the phrase. Don't force it in public.
Validation signal: kick and snare transients are not smearing. You can let go of the jog for at least eight bars without audible drift.
Exporting Playlists To DJ Software And USB
Most beginners practice at home with a controller and play out on club gear. That means your library needs to move cleanly between systems.
Plan for Export mode workflows. Rekordbox supports playlist management and USB export, with Sync Manager and Link Export available in Export mode. That's the path to performance-ready sticks.
If you organize outside your DJ app, keep the structure compatible. For example, you can export a hierarchical folder and playlist layout into Rekordbox, then write it to USB for supported players. Preserve the same folder to category to playlist hierarchy on export so it appears predictably in the player after import.
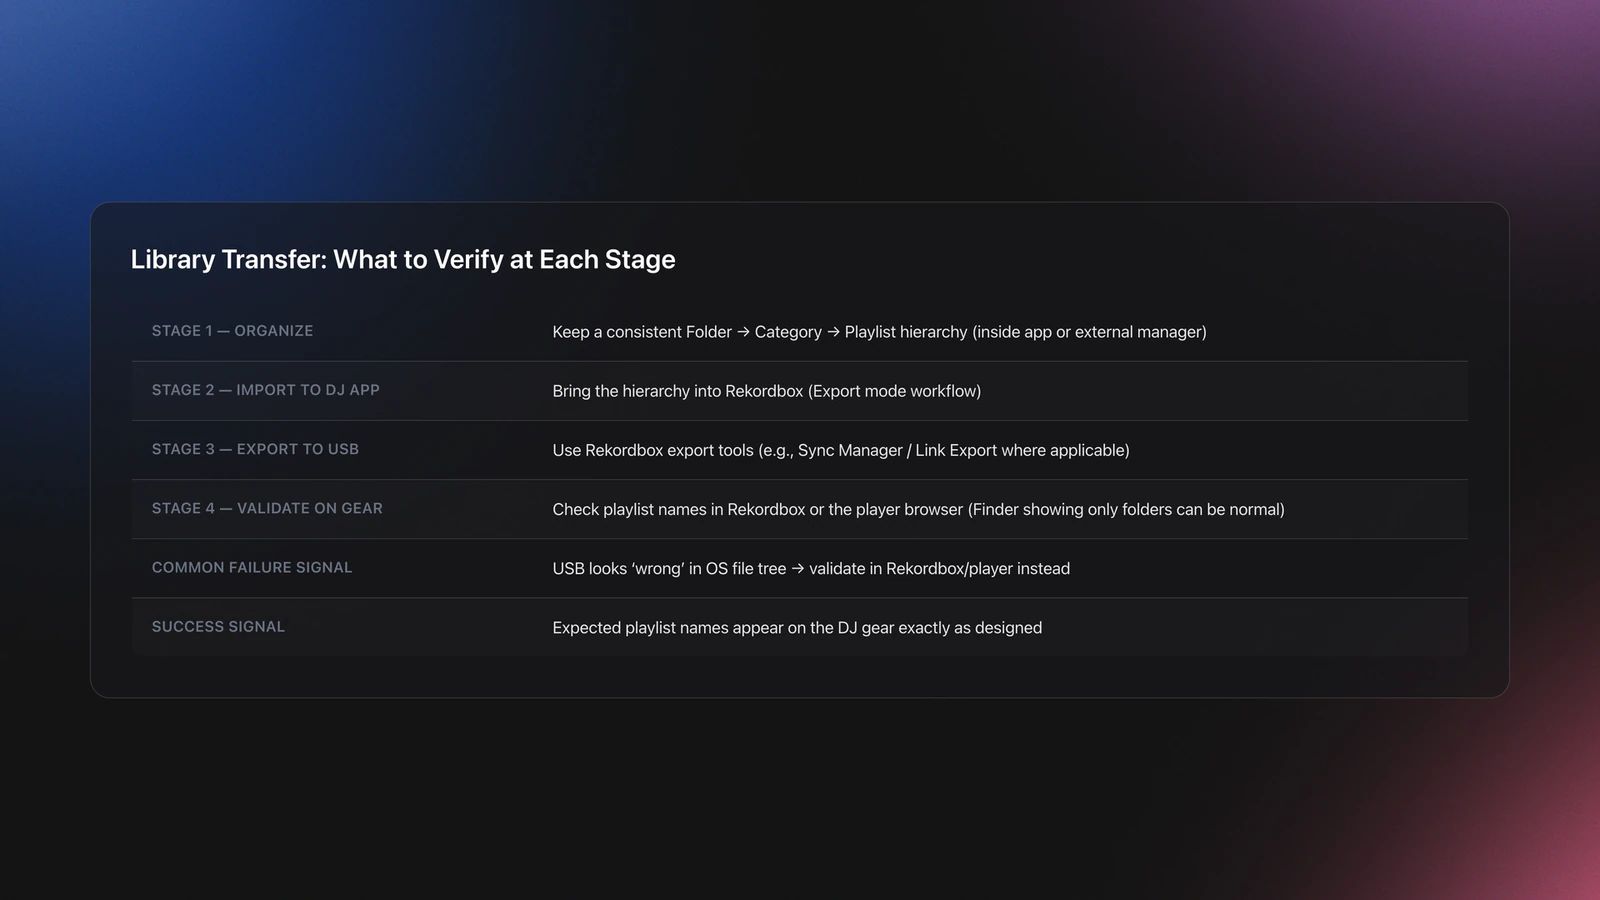
Validation signal: your USB shows the expected playlist names in the DJ gear's browser. If you only see folders on the stick in Finder, that's normal. Verify inside the player or Rekordbox, not the OS file tree.
Home DJ Setup For Beginners: Room And Monitoring
Small rooms exaggerate bass and reflections. Keep speakers away from corners. Angle them at ear height, form an equilateral triangle to your head, and listen quietly.
Headphone isolation is your friend. You should not need painful volumes to hear cue material. If you do, reduce room level and reposition monitors.
Protect your ears. Treat 85 dBA as a working average. As volume climbs, reduce time. Night after night exposure adds up.
Take breaks every 45 to 60 minutes, especially on loud systems or long practice sessions. Your future self will thank you.
A Practice Path That Builds Skill Fast
My first mixes were on a borrowed Traktor setup and then my own Pioneer DDJ-400, and what made it stick was working one skill at a time rather than fighting the whole instrument at once. Sequence your learning so each session targets one skill: first reliable monitoring, then beatmatching, then a single clean transition before you chase anything fancier. Keeping the focus narrow keeps your momentum high and prevents the early overwhelm that stalls most beginners.
Common Mistakes With Starter DJ Setup
| Mistake | Why It Happens | How to Avoid |
|---|---|---|
| Buying complex gear first | Too many features create decision fatigue | Get a twoâchannel controller with builtâin audio. Upgrade when you outgrow it. |
| No library structure | Scrolling during pressure moments | Create simple mood/energy playlists. Test them in practice. |
| Hot headphone levels | Poor isolation and loud room | Choose closedâback cans. Lower room volume. Adjust cue/mix balance. |
| Skipping buffer tuning | Lowâlatency obsession | Start safe. Lower buffer only after stability. |
| OverâEQing mixes | Using EQ to fix timing | Match timing first. Use EQ subtly to blend spectra. |
Concrete problems you can prevent on day one.
The visual way to organize your DJ library
Tag tracks by vibe. See everything at once. Export to any DJ software.
A visual system for organizing your DJ library.
Techniques Covered
Beat Matching
Crossfading
Transition Technique
DJ Rig Setup
DJ System Configuration
Library Optimization
Camelot Key Display Setup in Rekordbox, Serato and Traktor
Track Selection
Equipment & Software
Featured Gear
Documentation
Continue Your Learning Journey
Level Up Next
DJ Setup Guide: Wire a Reliable Rig From Bedroom to Club
intermediateProfessional DJ Controller: Battle vs Club Layout, Jogs, and I/O
advancedHow To Mix In Key Live: Worked Transitions And Failure Fixes
intermediate
Mix and Key: Practical Guide to Melodic DJ Mixing
intermediateHarmonic Mixing Guide for DJs: Energy & Workflow
intermediate
Camelot Wheel DJ: Layered Deck Mixing With EQ and Phrase
intermediateRelated Content

Beginner DJ Setup: Wire Your Controller, Then Play Your First Mix
beginnerDJ Setup Guide: Wire a Reliable Rig From Bedroom to Club
intermediateHow To Mix In Key Live: Worked Transitions And Failure Fixes
intermediateMix and Key: Practical Guide to Melodic DJ Mixing
intermediateCamelot Wheel DJ: Layered Deck Mixing With EQ and Phrase
intermediateFrequently Asked Questions

Hey, it's Ben Modigell 👋
I DJ and produce as so I so — downtempo, minimal, dub house, tech house, and techno (releases on Spotify and SoundCloud, links above). Everything I write here comes from my own gigs, studio sessions, and library cleanups: the rules I follow, the failure modes I've actually hit, and the workflow I use when nobody's watching. If a technique didn't earn its place in my own sets, it doesn't make it into a tutorial.