Loop Tightening
Loop Tightening is a DJ transition technique that shortens a live loop to build tension and release into a drop.
Loop Tightening Tutorials
Beginner DJ Equipment: What You Need
Loop Tightening is a DJ transition technique where you shorten a live loop on the outgoing track so the repetition speeds up and tension rises before the next drop lands. For DJs who play house, tech house, techno, or festival-style EDM, Loop Tightening adds drama without needing complex scratching or three-deck routines.
The reason DJs learn Loop Tightening is simple. It turns a standard handoff into a moment. When done well, the crowd hears the loop compress, the energy narrows, and the incoming drop feels bigger because you created contrast first.
If your transitions already feel clean but predictable, this is often the next skill to learn. It builds on master beat matching fundamentals and learn phrase alignment for drops, then adds a controlled performance gesture on top.
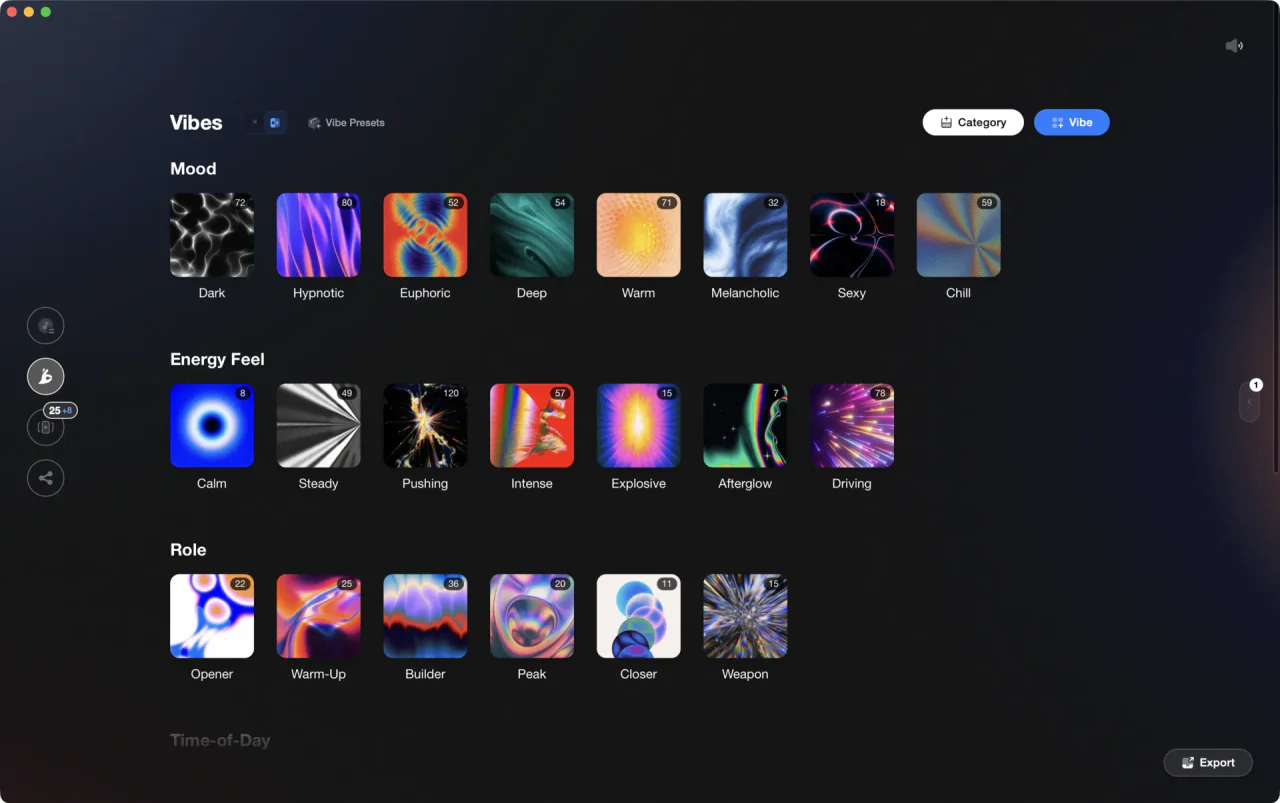
The visual way to organize your DJ library. Tag by vibe, export to any DJ app.
What Is Loop Tightening?
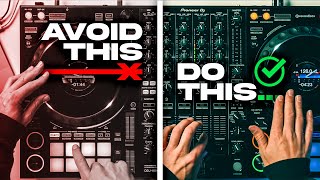
Loop Tightening is the practice of activating a short loop, usually near a breakdown or pre-drop phrase, then reducing its length in stages so the repeated audio becomes more urgent before you release into the next track.
Educational DJ guides describe it as a build-up tool used before a drop, often starting from a one-beat loop and shortening it while both tracks remain in phrase. Crossfader and other DJ educators place it alongside drop swaps and other EDM transition methods, not as a basic blend but as a performance technique.
In practical terms, you are not just looping for convenience. You are reshaping time. A vocal chop, synth stab, clap, or percussion hit repeats more often, which creates expectation. The incoming track then resolves that expectation.
That is why source material matters. Loops with one clear transient usually tighten better than busy full-spectrum audio. A muddy loop rarely builds tension. It usually builds clutter instead.
Why Loop Tightening Works
Loop Tightening works because repetition focuses attention. Each time you halve or manually shorten the loop, the pattern repeats more often, so the ear hears increased intensity even if the volume stays the same.
It also works because of phrasing. When both tracks are lined up correctly, the outgoing loop acts like a temporary build section while the incoming track continues toward its drop. The transition feels intentional rather than random.
Effects can support that motion, but they are optional. Many instructors suggest a light touch of echo or reverb to stretch the loop tail, while official software and hardware manuals focus on the underlying loop functions themselves: manual loops, saved loops, loop size changes, and loop-point adjustment.
Gear and Track Requirements
You need a setup that lets you create and adjust loops quickly. Serato DJ Pro supports manual and auto loops, plus saved loops per track. Pioneer CDJ players and similar hardware also allow loop-point adjustment with dedicated buttons and jog-wheel fine adjustment.
The best tracks for Loop Tightening share three traits. They have stable beatgrids, predictable phrase lengths, and a clean sound you can isolate. Four- or eight-bar pre-drop sections work especially well because the timing is easy to count and rehearse.
Choose outgoing material with a strong single event inside the loop. A vocal word, a snare, a clap, or a short synth stab is usually enough. If the loop contains too many moving parts, each reduction makes the sound messier rather than tighter.
Key compatibility helps too. If the outgoing loop has a tonal center, use harmonic mixing to reduce clashes so the repeated note does not fight the incoming drop.
How to Do Loop Tightening
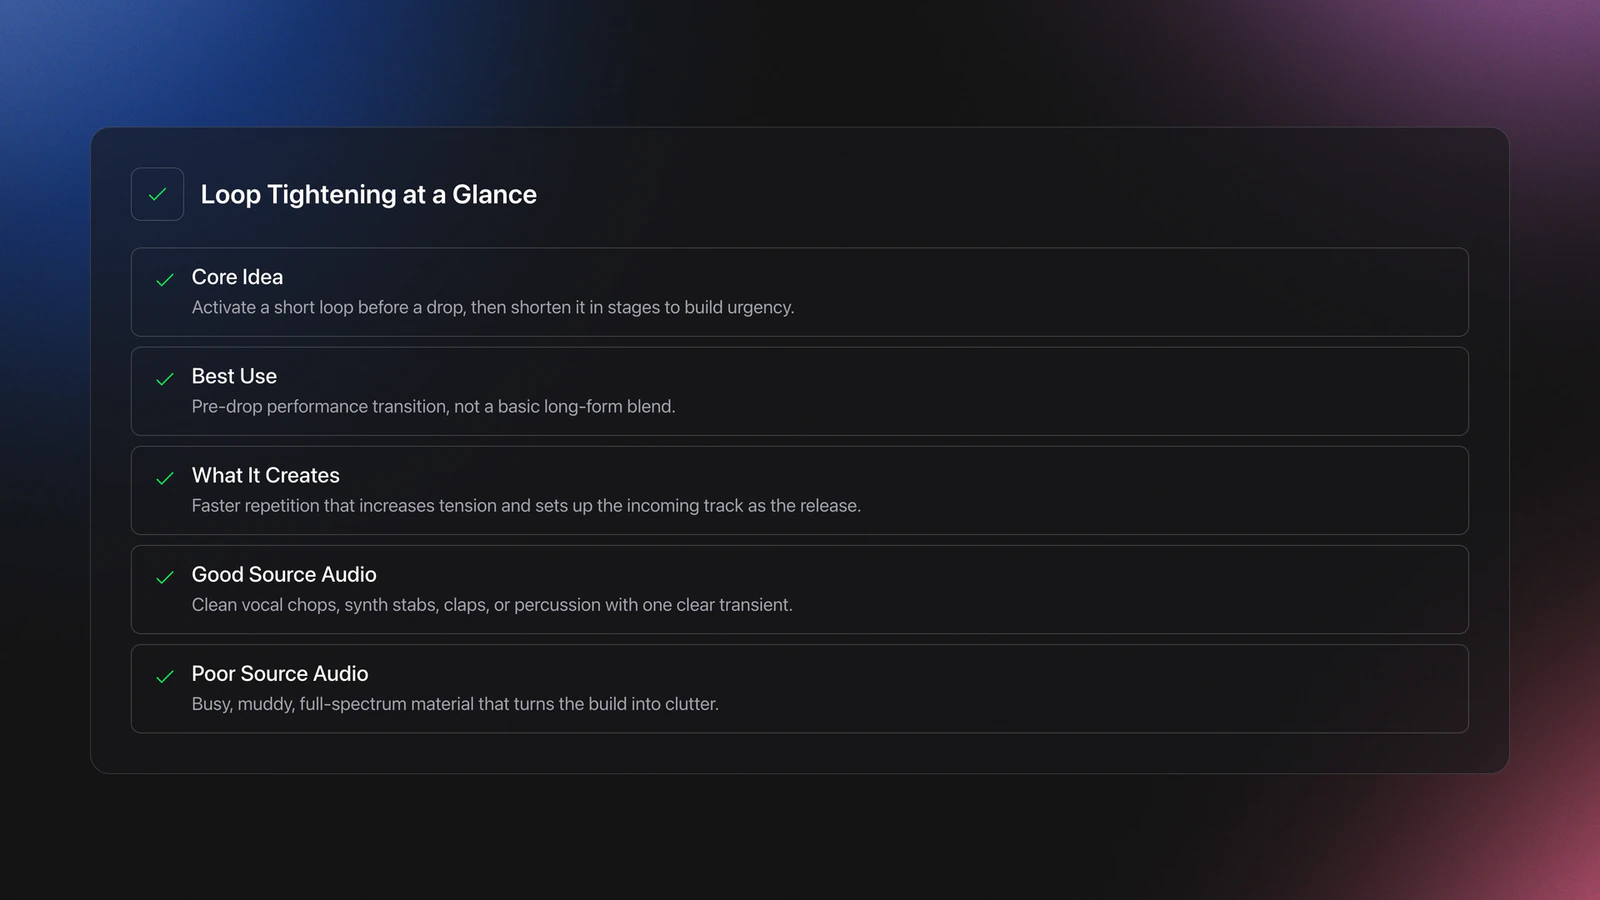
To do Loop Tightening, align two tracks so their drops land together, trigger a short loop on the outgoing track before the drop, reduce the loop length in time, then cut or release the loop as the incoming track takes over.
- Beatmatch both tracks and line up the drops.
- Start the mix with both tracks in phrase.
- Choose a clean loop source on the outgoing deck.
- Activate a 1-beat or 2-beat loop before the drop.
- Shorten the loop in stages as tension rises.
- Add light echo or reverb if needed.
- Exit or cut the loop exactly on the incoming drop.
The timing is the whole trick. If you trigger the loop too early, the effect drags. If you trigger it too late, the crowd barely perceives the acceleration. A good starting point is the final one or two bars before the new drop.
Most beginners should start with clean halving steps rather than freehand micro-adjustments. For example, move from 1 beat to 1/2 beat, then to 1/4 beat if your system and track stay stable. Some hardware also lets you enter loop-adjust mode and fine-tune in or out points with the jog wheel.
I found through years of daily 15 to 30 minute practice that short, repeatable drills beat long unfocused sessions here. Loop Tightening improves fastest when you rehearse the same two phrases for a week, track the release point, and judge whether the drop lands cleanly every time.
Do not chase the smallest possible loop right away. Once the repetition starts sounding like a pitched tone, you are already near the useful limit for many club transitions. Push further only if the source sound stays musical.
Manual vs Auto Loop Control
Manual and auto methods can both work for Loop Tightening, but they feel different. Auto loops are faster and more reliable on quantized tracks. Manual adjustment gives you more expressive control when you want to reshape the loop on the fly.
| Approach | Best For | Main Risk | What to Practice |
|---|---|---|---|
| Auto loop halving | Clean EDM and house tracks | Can feel mechanical if overused | 1 beat to 1/2 beat to 1/4 beat timing |
| Manual loop adjust | Expressive builds and custom loop shapes | Loop drifts if in/out points are off | Jog-wheel in/out correction during playback |
| Saved loops | Prepared sets and rehearsed routines | Less flexible in unfamiliar tracks | Trigger timing and release timing |
If your software offers quantize, keep it on while learning. Serato documentation notes that loop behavior and saved loops depend on the analyzed track and beatgrid, so inaccurate analysis can undermine the whole transition. Later, you can choose when to loosen that safety net.
Common Mistakes With Loop Tightening
Most Loop Tightening problems come from timing, source selection, or over-editing. The good news is that each one is easy to diagnose when you listen for the exact moment the transition stopped sounding intentional.
| Mistake | Why It Happens | Fix |
|---|---|---|
| Loop sounds messy | Source audio has too many elements | Use a vocal stab, clap, or synth hit instead |
| Drop feels late or early | Tracks are not phrased correctly | Count bars and rehearse the final 8 or 16 beats |
| Loop drifts or flams | Beatgrid or loop points are off | Check analysis, quantize, and loop-point adjustment |
| Effect sounds cheesy | Too much echo or reverb | Use subtle FX or skip FX entirely |
| Build loses impact | Loop starts too soon | Trigger later, usually in the last 1 to 2 bars |
Another common issue is trying to fix a weak track choice with performance tricks. Loop Tightening cannot rescue two songs that do not belong together. If the drops clash in groove, tone, or energy, the transition will still feel forced.
This is where organized prep helps. Some DJs keep a dedicated practice crate of tracks with clean breakdowns, strong single-hit sounds, and matching phrase lengths. In Vibes, that kind of drill library can be grouped by energy, drop type, or loop-friendly vocal moments so you repeat the same test conditions until the timing becomes automatic.
Practice Drills for Loop Tightening
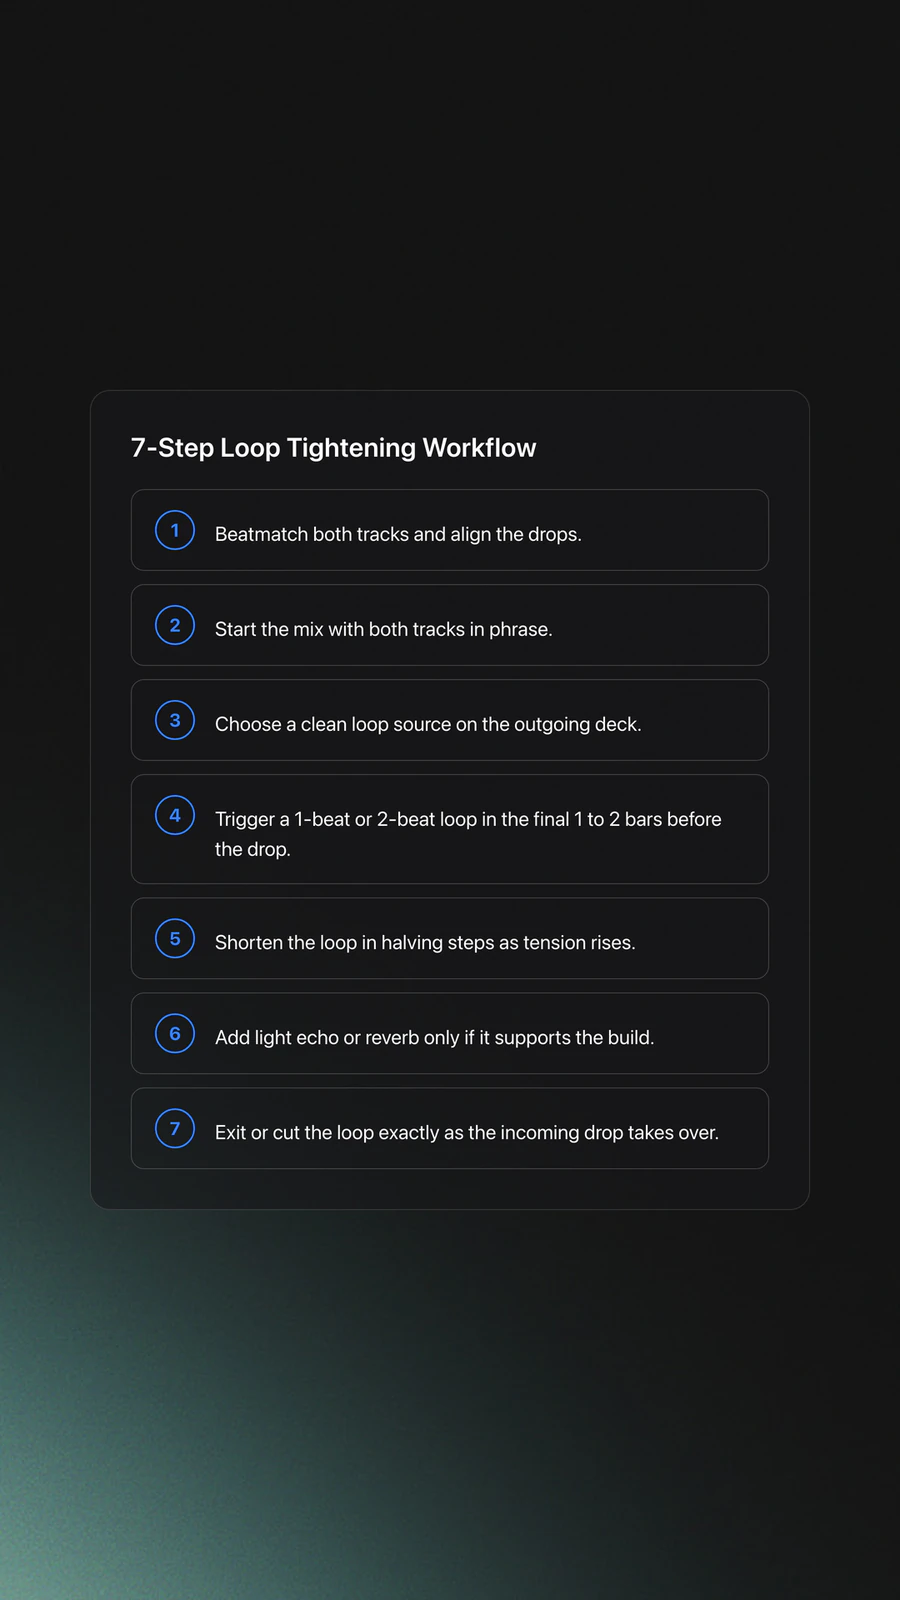
The fastest way to learn Loop Tightening is to isolate one variable at a time. First lock timing. Then choose better loop material. Then practice the release. Trying to improve all three at once usually slows progress.
Start with two tracks in the same BPM range, ideally between 124 and 130 BPM. Count the final 16 beats before the incoming drop out loud. Trigger a 1-beat loop on beat 1 of the last bar, halve it once, then exit exactly on the drop.
Once that works, extend the drill. Run the same transition five times in a row without changing songs. If four out of five releases land cleanly, move on. If not, stay there until the timing becomes predictable.
A second drill focuses on loop source quality. Load one track and test five possible loop points near the breakdown. Rank them by clarity. You are training selection, not finger speed.
A third drill adds light FX. Keep the effect level low enough that the loop still defines the build. If the effect becomes the main event, you are practicing echo transitions, not Loop Tightening.
In my experience, 15-minute focused sessions over a 2 to 4 week cycle produce better results than marathon practice. The measurable goal is simple: make the final bar feel smaller and more urgent without losing the groove or missing the drop.
Measurable Checkpoints
Good technique needs clear benchmarks. Without them, Loop Tightening feels flashy one day and inconsistent the next.
Use these checkpoints as your baseline. First, hold phrase alignment for the full final 16 beats. Second, trigger the loop on the intended beat three times in a row. Third, shorten the loop without audible drift. Fourth, release on the incoming drop without a gap or collision.
A strong intermediate checkpoint is this: perform a loop-tightening transition at 126 to 128 BPM, starting from a 1-beat loop, reducing it once or twice, and landing the drop cleanly for five consecutive attempts.
Where Loop Tightening Fits in a Set
Loop Tightening works best when you want a dramatic handoff, not an invisible blend. It suits peak-time moments, breakdown-to-drop swaps, and short attention spikes inside energetic genres.
Use it sparingly. If every transition tightens into a micro-loop, the crowd learns the trick and the effect loses weight. Save it for sections where tension and release are already part of the music.
It also pairs well with related skills. After you can control this reliably, the natural progression is to study drop swaps, loop rolls, and more advanced transition design. Clean phrasing still matters more than any trick.
Next Steps
Loop Tightening is not about pressing the smallest loop button. It is about controlling tension, phrase timing, and release so the next drop feels earned.
Keep these takeaways in mind:
- Choose clean, loop-friendly source sounds.
- Practice release timing before adding extra FX.
- Use short, repeatable drills and track consistency over weeks.
Start with one rehearsed pair of tracks, one loop length, and one release point. Once that feels easy, branch into drop swaps or three-deck layering. That is where Loop Tightening stops being a trick and becomes part of your set design.
The visual way to organize your DJ library
Tag tracks by vibe. See everything at once. Export to any DJ software.
A visual system for organizing your DJ library.
Frequently Asked Questions

Hey, it's Ben Modigell 👋
I DJ and produce as so I so — downtempo, minimal, dub house, tech house, and techno (releases on Spotify and SoundCloud, links above). Everything I write here comes from my own gigs, studio sessions, and library cleanups: the rules I follow, the failure modes I've actually hit, and the workflow I use when nobody's watching. If a technique didn't earn its place in my own sets, it doesn't make it into a tutorial.