Drum Machine Programming
Drum machine programming is the craft of building drum patterns with step sequencing, timing control, accents, and variation to create grooves that feel intentional and performance-ready.
Drum Machine Programming Tutorials
House Music YouTube Guide
Drum machine programming is the process of creating drum patterns with a step sequencer, pads, or a piano roll so the groove feels clear, controlled, and musical. Learn it if you want drums that support mixes, edits, and DJ tools instead of sounding flat or random. Good drum machine programming gives you cleaner energy, stronger transitions, and patterns you can trust in production or live use.
For most people, the challenge is not placing kicks and snares. It is making them feel alive. The difference usually comes from timing, accent, swing, density, and variation rather than complexity alone. That is why drum machine programming matters whether you work in house, techno, hip-hop, or electro.
If your timing foundation still feels shaky, start by master beat matching fundamentals. Strong grid awareness makes every sequencing decision easier.
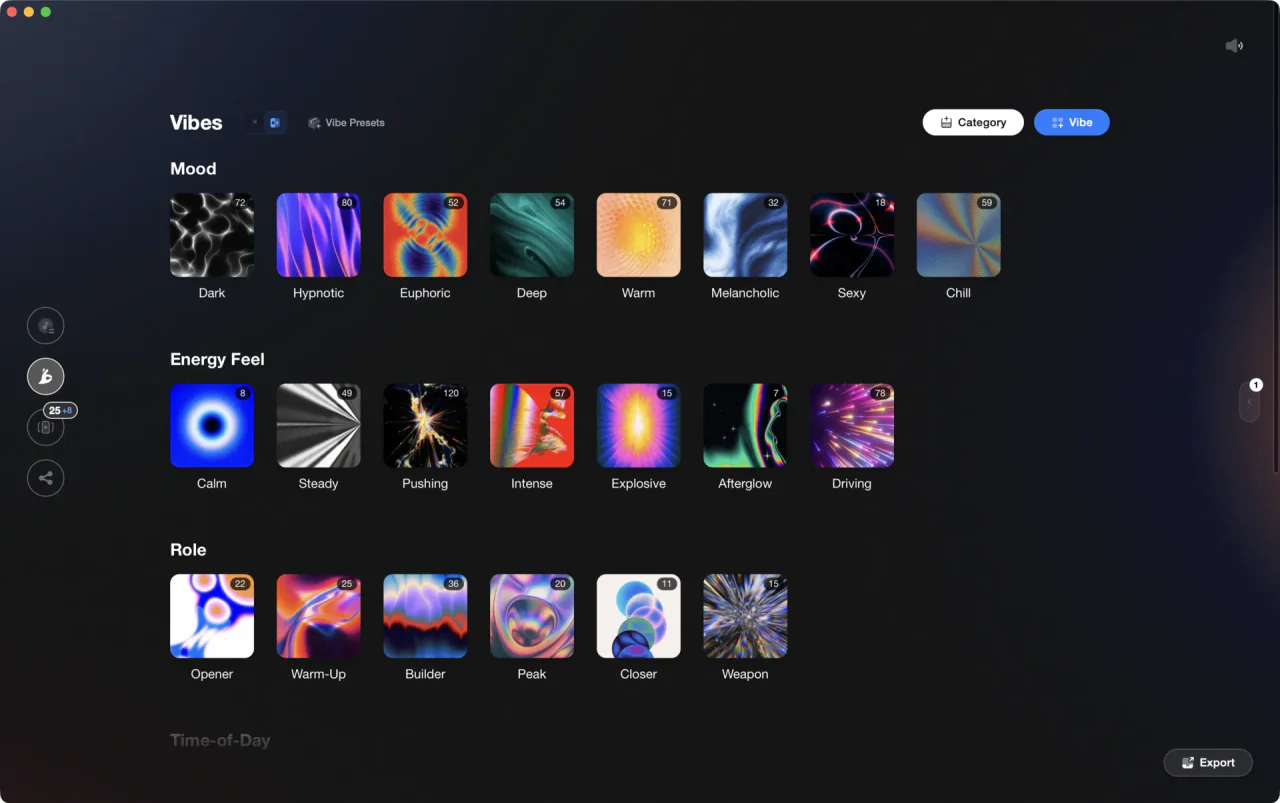
The visual way to organize your DJ library. Tag by vibe, export to any DJ app.
What Is Drum Machine Programming?
Drum machine programming is the technique of arranging drum hits across sequencer steps or recorded MIDI events to form a repeatable rhythmic pattern. In practice, it combines sound choice, step placement, swing, velocity, and pattern variation so a groove feels intentional rather than robotic.
Most modern workflows use either step input or real-time input. Roland manuals describe step sequencers as loop-based systems where you enter events per step, often with adjustable step length, shuffle, velocity, and probability. MusicRadar also notes that common step counts are 8, 16, or 32, which shapes how patterns repeat and evolve.
At a basic level, you place the kick to define weight, the snare or clap to define backbeat, and the hats or percussion to define motion. From there, the craft becomes subtler. You shape the groove through micro-decisions that listeners feel more than notice.
This is why strong drum programming can sound simple. A one-bar loop with the right accents and swing often hits harder than an overfilled four-bar pattern.
Why Learn Drum Machine Programming
Drum machine programming improves timing control, groove design, and arrangement decisions. It also helps DJs and producers create tools that translate well into intros, edits, live transitions, and performance loops.
- Build grooves that hold energy without overcrowding the mix
- Create genre-specific feel through swing, accents, and subdivision choices
- Write tighter edits and transition tools for DJ sets
- Develop better rhythmic listening by recreating reference patterns
- Turn static loops into evolving patterns with fills and variation
It also sharpens your ear. Once you start hearing how small timing shifts affect feel, you will listen to records differently.
Core Sequencer Workflow
A reliable drum machine programming workflow starts with pulse first, movement second, detail third. Build the loop in that order and most beginner mistakes disappear.
Step 1 is to set bar length and subdivision. A 16-step pattern usually maps cleanly to one bar of 4/4 with 16th-note resolution, while longer 32-step patterns make room for small variations and fills. Roland documentation and MusicRadar both frame step length and shuffle as core controls because they change how the pattern breathes.
Step 2 is to place the anchor hits. In many dance styles, that means a kick pattern first, then snare or clap, then closed hats. Keep this first version plain. You are sketching the pocket, not finishing the track.
Step 3 is to add accents and velocity contrast. Accent lanes on classic TR-style machines are useful because they make selected steps speak harder, and many modern sequencers offer per-step velocity for the same purpose. Without that contrast, repeated hits blur together.
Step 4 is to adjust swing or shuffle carefully. Swing delays certain off-beat steps, which loosens the groove and changes its body feel. Native Instruments and Ableton both describe swing as a way to add groove, but too much can make the rhythm collapse.
Step 5 is to introduce variation. Use a second bar, a last-step change, a fill, or a muted hit to stop the loop from feeling static. Variation should reinforce the main pulse, not distract from it.
Step 6 is to test the groove in context. Solo loops can be misleading. A pattern that feels exciting alone may crowd the bass or clash with phrasing once the track fills out.
| Step | Action | Key focus |
|---|---|---|
| 1 | Set pattern length and resolution | Match the grid to the groove you want |
| 2 | Place kick and backbeat | Establish pulse and weight |
| 3 | Add hats or percussion | Create forward motion |
| 4 | Apply velocity or accent changes | Shape emphasis and contour |
| 5 | Dial in swing or microtiming | Add feel without losing clarity |
| 6 | Create one variation or fill | Keep repetition musical |
If you want the shortest version, use this sequence: choose subdivision, place anchors, add motion, shape accents, then test feel. That is the core of how to approach drum machine programming.
How To Program a Basic Groove
To program a basic groove, start with a simple one-bar pattern, lock the kick and backbeat first, then add hats, accents, and a small amount of swing. Once the loop feels stable, create one variation for the second bar.
Begin with the kick. In straight house, four-on-the-floor gives instant structure. In hip-hop or broken styles, start with the strongest downbeats before placing syncopated kicks.
Add the snare or clap next. In many grooves, placing it consistently on beats two and four creates the clearest frame. That frame lets later syncopation feel intentional rather than messy.
Now add hats. Closed hats often carry the sense of speed, especially when the kick stays simple. If the loop feels rigid, lower some hat velocities before you change timing.
Then create hierarchy. One kick should feel strongest. One backbeat should feel like a reference point. One or two hat hits can push the bar forward.
Finally, duplicate the bar and change only one thing. Remove a hat before the snare, add a ghost hit, shorten the last step, or insert a tiny fill. Small changes usually groove better than dramatic rewrites.
Feel, Swing, and Humanization
Feel in drum machine programming comes from controlled timing and dynamic contrast, not random imperfections. The goal is not to make the machine sloppy. The goal is to make the pattern breathe.
Ableton tutorials on swing and humanizing drums emphasize that groove comes from timing relationships. Native Instruments also highlights the balance between quantized precision and humanized variation. In other words, keep the pulse readable while moving selected off-beats or changing hit strength.
A useful starting point is this: keep major anchors stable and move lighter notes first. Shift hats, shakers, and ghost notes before you shift the main kick or backbeat. That preserves structure.
Velocity matters just as much. MusicRadar notes that limited, deliberate velocity values can sound more believable than constant full-level hits. In practice, three or four clear levels often work better than endless tiny changes.
You can also humanize by omission. Muting a repeated percussion step every second bar often creates more life than adding another sound.
If your library of reference loops is messy, structured practice gets harder. One practical way to improve is to sort examples by genre, swing feel, and density in Vibes so you can compare a straight techno loop against a shuffled house loop or a swung hip-hop pattern during focused drills.
Practice Drills for Drum Machine Programming
The fastest way to improve is to isolate one variable at a time. Through daily 15-minute practice sessions over several years, I found that short loop-focused drills build better groove instincts than long unfocused sessions.
Drill one is pattern recreation. Pick a reference groove and recreate only the kick and snare. Then add hats. Then compare timing, density, and accents.
Drill two is swing calibration. Program the same one-bar loop three ways: straight, lightly swung, and heavily swung. Listen for the point where the groove opens up, then the point where it starts to drag.
Drill three is accent mapping. Keep step placement identical but create three different versions using velocity and accent only. This teaches that feel can change without moving any notes.
Drill four is variation control. Build a two-bar loop where bar two changes only one event. Then build another where bar two changes three events. The better version is usually the one that keeps the main identity intact.
Drill five is last-step editing. Change pattern length or remove the final hit to study tension and reset. Many sequencers make this easy, and it is one of the quickest ways to escape a static loop.
Most practitioners improve noticeably within 2 to 4 weeks if they repeat these drills five days per week. Track one measurable outcome at a time, such as making two-bar loops that retain energy without overfilling every 16th note.
Common Mistakes
Most drum machine programming problems come from too much information, not too little. When the groove fails, simplify first.
| Mistake | Why it happens | Fix |
|---|---|---|
| Overcrowded patterns | You add detail before defining pulse | Mute extra hits until kick, backbeat, and hats read clearly |
| Too much swing | You chase feel with large timing shifts | Apply swing to lighter notes first and back it off |
| Flat dynamics | Every step hits at similar velocity | Use 3 to 4 intentional accent levels |
| No variation | The loop repeats exactly for too long | Create one second-bar change or a short fill |
| Genre mismatch | Subdivision choices ignore style norms | Study reference grooves from the target style |
Another common mistake is copying visual patterns without listening to body feel. A groove that looks correct on the grid can still feel wrong if the accent pattern fights the tempo.
Equipment and Setup
You only need a sequencer, drum sounds, and a way to monitor clearly to practice drum machine programming. Optional tools improve speed, but they do not replace groove judgment.
Hardware drum machines often encourage better decisions because they limit options and make step relationships obvious. Roland step sequencer workflows, for example, center the eye on step count, accent, shuffle, and pattern variation. That simplicity can speed learning.
Software offers easier editing and comparison. DAWs let you save alternate patterns, copy bars quickly, and test multiple groove settings on the same pattern, which is ideal for structured drills.
If you perform as a DJ or build tools for sets, create folders for intros, percussion loops, broken grooves, and fill patterns. Later, learn phrase alignment for cleaner transitions so those patterns fit naturally into performance structure.
Genre Examples and Creative Choices
Different genres ask different things from drum machine programming. The underlying tools stay similar, but the priorities change.
In house, consistency often matters most. A stable kick, clear clap placement, and small hat variation can carry an entire groove. Swing usually supports motion rather than dominating it.
In techno, repetition and sound design often work together. A pattern may stay simple while accents, decay, filtering, or probability create evolution.
In hip-hop, the relationship between kick placement, snare weight, and swung hats becomes more expressive. Small timing decisions can completely change the pocket.
In electro and breaks, syncopation and contrast become more obvious. Short fills, offset percussion, and changed step lengths can add tension fast.
When the core pattern feels too thin, explore sample layering for bigger drums. Just make sure layering supports groove instead of masking weak sequencing.
Troubleshooting a Weak Groove
If a programmed beat feels weak, check pulse, spacing, and contrast in that order. Do not start with plugins or random edits.
First, mute everything except kick and snare or clap. If that stripped version does not feel grounded, the issue is placement, not polish.
Second, listen to hats and percussion by themselves. If they feel busy but directionless, reduce density before changing timing. Too many notes often hide the groove center.
Third, inspect dynamics. If every hit is loud, nothing feels important. Add one obvious peak and a few softer supporting hits.
Fourth, test against a reference. Recreating part of a known loop is one of the fastest ways to hear whether your subdivision and swing choices fit the style described by educators like Ableton and Native Instruments.
Safe Monitoring While Programming
Safe monitoring matters because drum machine programming often involves long, repetitive listening at close range. OSHA states that exposure over 85 dBA can damage hearing, and NIOSH commonly recommends keeping 8-hour exposure below that level.
For practical studio habits, keep headphone and monitor levels moderate, take short breaks every hour, and lower volume when editing harsh hats or transient-heavy loops. If you need more impact, improve sound choice and contrast before you turn up playback.
Key Takeaways
Drum machine programming is really the art of making a loop feel inevitable. You do that with placement, hierarchy, swing, and controlled variation rather than constant complexity.
Three points matter most. First, establish pulse before detail. Second, use accents and velocity to create shape. Third, make small changes across bars so repetition stays musical.
Your next step is simple: program one clean one-bar groove, build one second-bar variation, and compare straight versus swung versions. From there, the progression becomes clear.
The visual way to organize your DJ library
Tag tracks by vibe. See everything at once. Export to any DJ software.
A visual system for organizing your DJ library.
Frequently Asked Questions

Hey, it's Ben Modigell 👋
I DJ and produce as so I so — downtempo, minimal, dub house, tech house, and techno (releases on Spotify and SoundCloud, links above). Everything I write here comes from my own gigs, studio sessions, and library cleanups: the rules I follow, the failure modes I've actually hit, and the workflow I use when nobody's watching. If a technique didn't earn its place in my own sets, it doesn't make it into a tutorial.