Multiband Dynamics Adjustment
Multiband Dynamics Adjustment controls different frequency ranges independently so a mix stays punchy, balanced, and clear under changing energy.
Multiband Dynamics Adjustment Tutorials
Mixed In Key Manual for DJs
Multiband Dynamics Adjustment is worth learning if your mixes feel close, but not controlled. It helps when the low end swells, the mids get crowded, or the highs turn sharp as energy rises. Instead of compressing the whole signal at once, Multiband Dynamics Adjustment lets you control separate frequency areas with purpose.
For DJs and electronic music performers, that matters most in edits, transitions, drum buses, and recorded set prep. A good multiband move can tighten a boomy loop, smooth brittle hats, or stop bass from pushing everything else down. If you already build solid compression fundamentals, this technique gives you more precise control.
The visual way to organize your DJ library. Tag by vibe, export to any DJ app.
What Is Multiband Dynamics Adjustment?
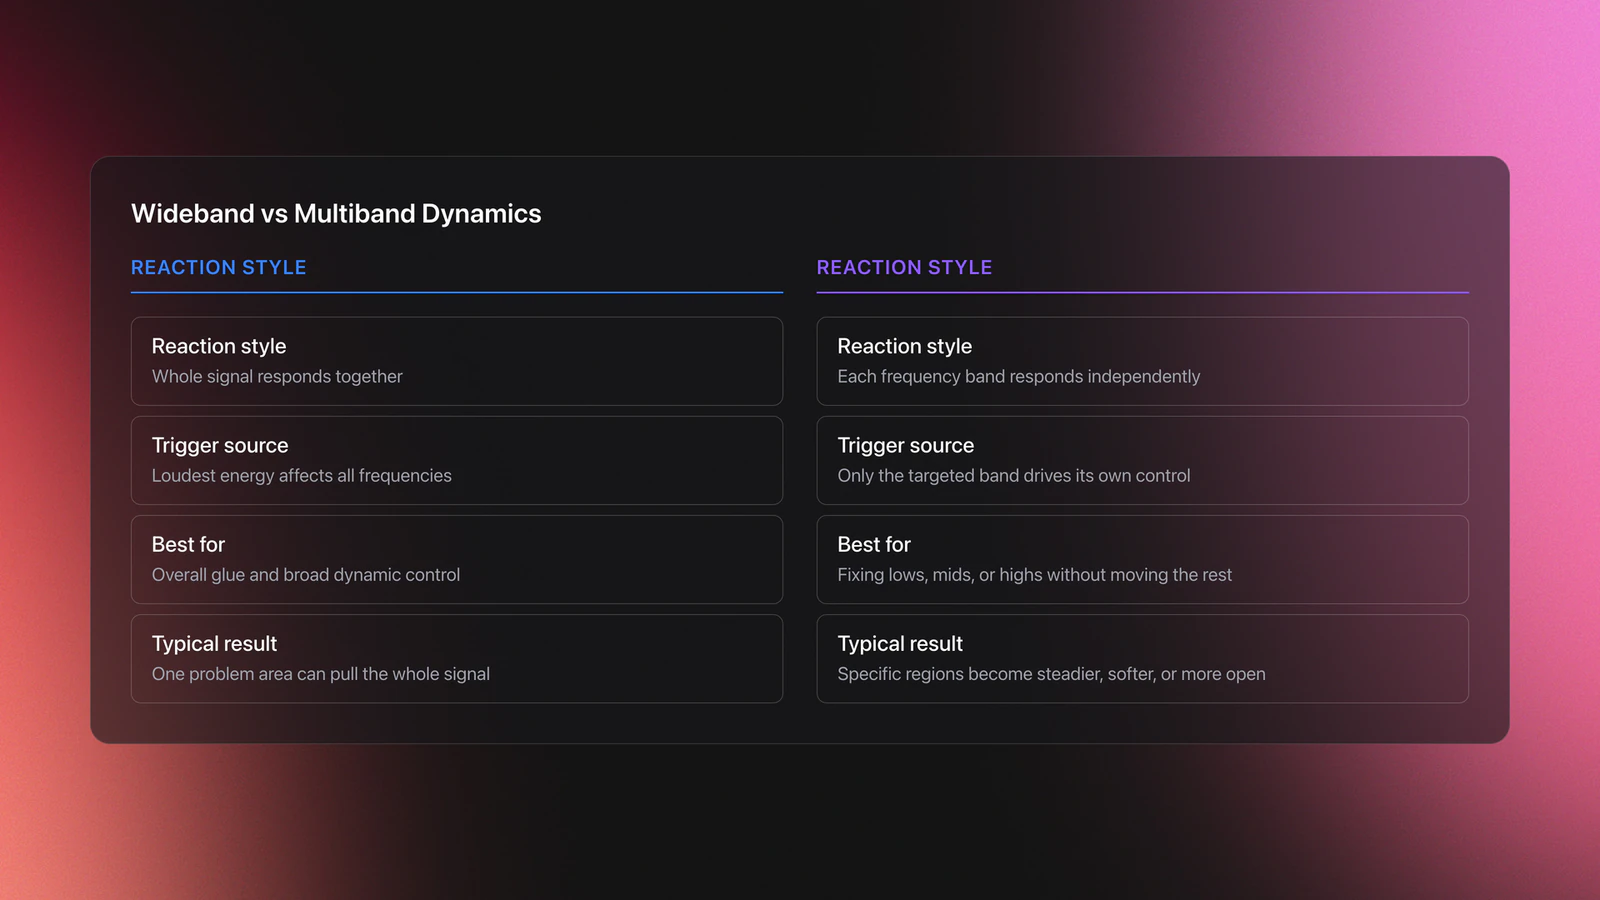
Multiband Dynamics Adjustment is the practice of splitting audio into frequency bands and applying separate dynamic control to each band. In practical terms, you can compress, expand, or shape lows, mids, and highs independently so one problem area does not force the whole signal to react.
That is the core reason the technique exists. A wideband compressor reacts to the loudest energy in the signal. A multiband processor reacts band by band.
Ableton describes Multiband Dynamics as a device for modifying dynamic range across up to three independent frequency bands, while FabFilter explains the same idea as frequency-specific compression and expansion built around movable bands. iZotope frames multiband compression as several compressors, each working on one part of the spectrum, divided by crossover points.
In other words, this technique is not just about making things louder. It is about deciding which part of the sound should become steadier, softer, denser, or more open.
Why Use Multiband Dynamics
You use Multiband Dynamics Adjustment when the problem is dynamic and frequency-specific. If the bass only gets unruly on certain hits, or the highs only turn harsh at peak moments, multiband control is often more useful than static EQ.
This is where many people misuse it. If a sound is simply too bright all the time, regular EQ may fix it faster. If only a narrow harsh zone jumps out on a few words or hits, compare dynamic EQ for narrower problem bands before reaching for a wider multiband band.
The technique also helps when you want the low band to stay stable while the mids and highs keep movement. Sound On Sound notes that the big advantage is simple: a loud low-frequency event does not have to drag down the rest of the mix. iZotope makes the same distinction when explaining why multiband tools are useful for larger frequency regions rather than narrow resonances.
- Tighten low-end peaks without dulling mids and highs
- Control harsh cymbals or hats only when they spike
- Add density to a bus while preserving punch
- Use expansion or upward moves to restore movement
- Handle kick and bass conflicts with more precision
Gear and Setup Requirements
The minimum setup is straightforward. You need a DAW or editing environment, a multiband dynamics processor, and monitoring you trust enough to hear small changes in low-end control and high-end harshness.
A plugin with visible crossover points, gain reduction meters, and solo-per-band monitoring makes learning much easier. FabFilter Pro-MB, Ableton Multiband Dynamics, and Ozone Dynamics all expose the core ideas clearly, though each presents them differently.
For practice, reference tracks matter as much as software. If you organize DJ edits, drum loops, and problem examples by issue type inside Vibes, it becomes easier to compare boomy lows, boxy mids, and sharp highs in repeatable sessions instead of guessing from memory.
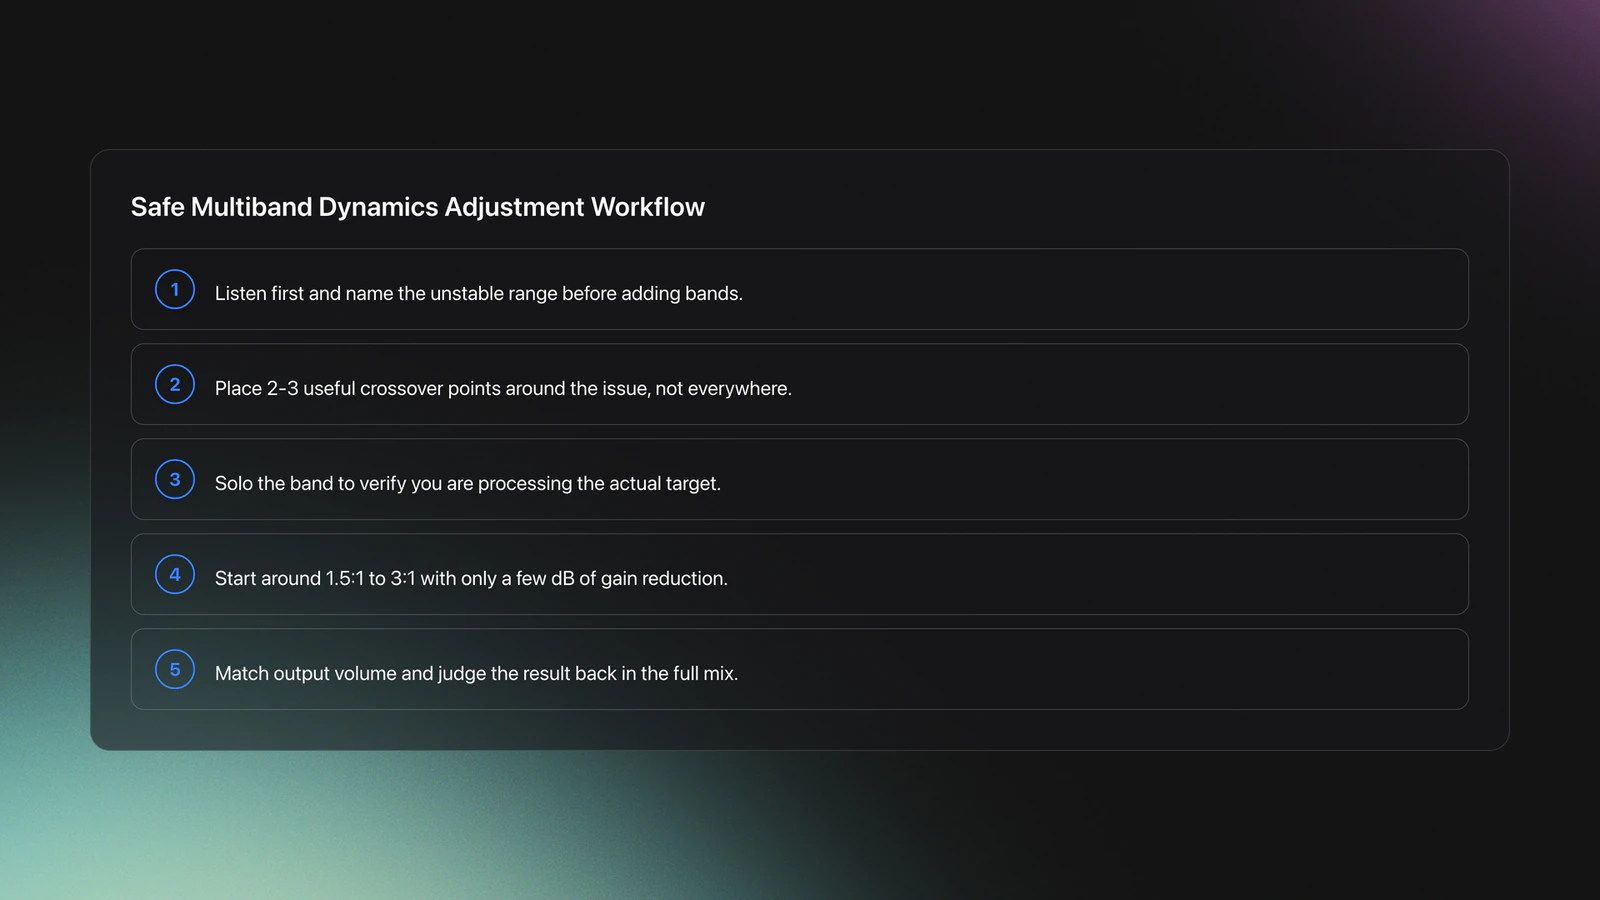
How to Adjust Multiband Dynamics
The fastest safe workflow is to identify the problem first, then create the fewest bands needed to solve it. Most engineers do not need four or six active bands on every source. Often one problem band is enough.
Start by listening without looking. Ask one question: which part of the spectrum moves in the wrong way? Low-end bloom, midrange congestion, and high-frequency bite each suggest a different band target.
Next, place crossover points around the problem area. iZotope recommends deciding three things first: how many bands, where the crossovers sit, and what settings each band needs. That order prevents random tweaking.
Then apply conservative settings. A ratio around 1.5:1 to 3:1, gentle threshold movement, and only a few decibels of gain reduction is usually enough to tell whether the idea is working. If you need extreme reduction, the source may need EQ, arrangement, or track-level fixes instead.
| Step | Action | Key Point |
|---|---|---|
| 1 | Identify the unstable range | Find the problem before loading bands |
| 2 | Set 2-3 useful crossover points | Keep bands broad unless the issue is specific |
| 3 | Solo the band and confirm the target | Do not process what you have not heard clearly |
| 4 | Apply light compression or expansion | Start with subtle gain reduction |
| 5 | Level-match the output | Louder almost always sounds better at first |
| 6 | Recheck in full context | The mix matters more than the solo band |
Attack and release should follow the source. Faster attacks can catch harsh transients or spiky low-end hits. Slower attacks can preserve punch. Releases should return naturally with the groove, not chatter between hits.
On dance material, low bands often need slower recovery than high bands because bass energy holds longer. High bands can usually release faster without obvious pumping.
If your plugin offers upward compression, upward expansion, or sidechain-aware triggering, add those later. The core technique is still the same: control one moving frequency region without disturbing the rest.
Where It Works Best
Multiband Dynamics Adjustment works best when the source already sounds close to right. It is a refinement tool first. That is why it appears so often on buses, stems, masters, and selected problem tracks.
On a drum bus, it can control sub weight while leaving snare crack alone. On a bass, it can steady the low fundamentals while preserving upper harmonic detail. On a mix bus, it can gently tame low-end surges or soften top-end spikes that wideband compression would overreact to.
It is also useful in kick-bass interaction. Instead of ducking the whole bass each time the kick lands, you can explore sidechain compression for frequency-aware ducking and only control the bass region that masks the kick.
Ableton's recent OTT-related material also shows the more aggressive side of multiband dynamics. That sound is popular in creative sound design, but it is a different use case from corrective adjustment. Learn the controlled version first.
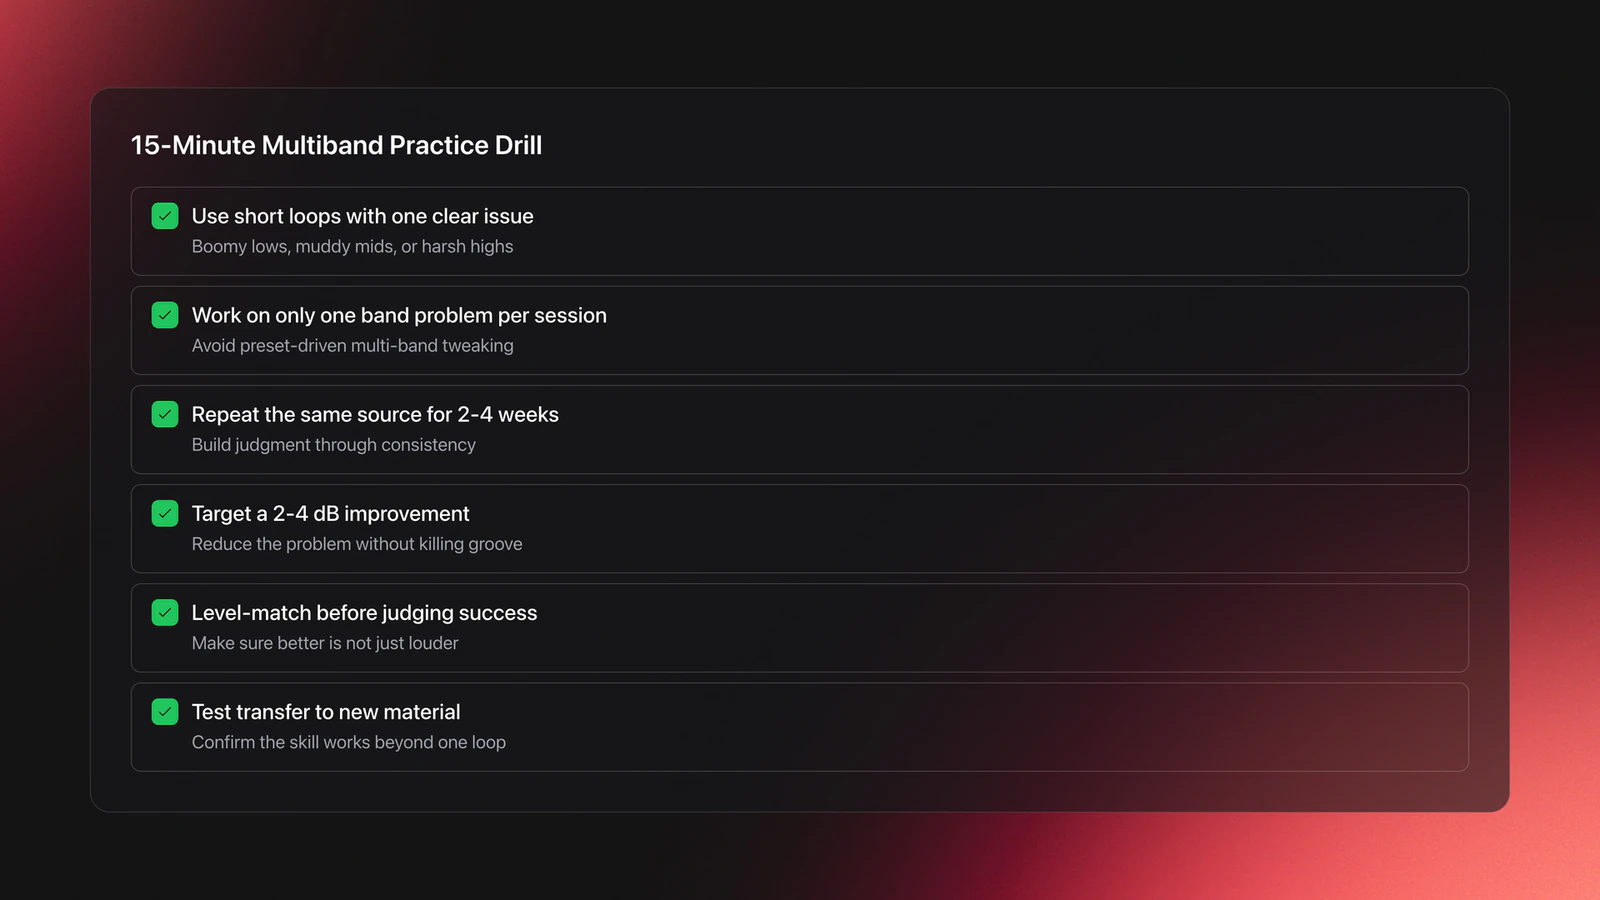
Practice Drills for Faster Progress
Practice should be narrow and repeatable. Through daily 15-minute practice sessions over several years, I found that one-band problem solving builds faster judgment than loading a preset and tweaking all bands at once.
Start with short loops. Pick one loop with boomy lows, one with muddy mids, and one with harsh highs. Work on only one issue per session.
Measure progress by consistency, not by complexity. Most instructors recommend short cycles where you repeat the same source material for two to four weeks, then test whether your decisions transfer to new tracks.
A useful checkpoint is simple: can you reduce a low-end swell by 2 to 4 dB, keep the groove intact, and level-match the result so it still sounds better when output volume is equal? If not, go slower.
Common Mistakes with Multiband Dynamics
The biggest mistake is using multiband dynamics to fix arrangement or gain problems. If the kick, bass, and synth are all fighting, clean up gain staging before adding heavy processing and solve obvious balance issues first.
The second mistake is overbuilding the processor. More bands feel powerful, but they also create more crossover interactions, more phase decisions, and more ways to flatten the sound.
| Mistake | Why It Happens | Fix |
|---|---|---|
| Too many active bands | More control feels safer | Use the fewest bands needed |
| Over-compressing the master | Louder sounds impressive at first | Level-match and keep reduction modest |
| Choosing bad crossover points | Bands are set visually, not by ear | Solo bands and move crossovers until the target is clear |
| Using it instead of EQ every time | The tool feels more advanced | Use EQ for static issues and dynamic EQ for narrow moving ones |
Another common error is ignoring phase mode or crossover behavior. FabFilter highlights dynamic, linear, and minimum-phase options because those choices affect latency, ringing, and how transparent the result feels.
Finally, do not trust solo mode too much. A band can sound ugly in isolation and still be exactly right in the full mix.
Troubleshooting by Problem Type
If the low end feels unstable, use broader low-band control first. Aim for gentle gain reduction and leave enough attack to preserve impact.
If the mids feel crowded, check whether the issue is tonal or dynamic. If the boxiness stays constant, use EQ mixing to solve static tone problems. If it appears only when the part gets busy, multiband control makes more sense.
If the highs are sharp, start with a high band or dynamic EQ comparison. iZotope notes that dynamic EQ is often more transparent for narrower problem areas, while multiband compression suits broader frequency regions.
If the whole mix turns smaller after processing, you probably compressed too much or set crossovers in musically important ranges. Back off thresholds, widen the target band, or remove a band entirely.
Learning Path and Next Step
Multiband Dynamics Adjustment gives you finer control over movement inside a mix. It works best when you already know what standard compression and EQ can do, and when you use it to solve a clear frequency-specific problem instead of processing by habit.
Keep these takeaways in mind:
- Use the fewest bands needed to solve the issue
- Treat broad moving problems, not every tonal problem
- Judge results level-matched and in context
Start with one band on one problem loop. Then compare it against wideband compression and dynamic EQ. Once that judgment becomes reliable, move into bus work and more advanced mix decisions.
The visual way to organize your DJ library
Tag tracks by vibe. See everything at once. Export to any DJ software.
A visual system for organizing your DJ library.
Frequently Asked Questions

Hey, it's Ben Modigell 👋
I DJ and produce as so I so — downtempo, minimal, dub house, tech house, and techno (releases on Spotify and SoundCloud, links above). Everything I write here comes from my own gigs, studio sessions, and library cleanups: the rules I follow, the failure modes I've actually hit, and the workflow I use when nobody's watching. If a technique didn't earn its place in my own sets, it doesn't make it into a tutorial.