Piano Play
A practical method for developing posture, touch, timing, coordination, and expression at the piano while avoiding strain.
Piano Play Tutorials

Professional DJ Controller: Battle vs Club Layout, Jogs, and I/O
Piano Play is the foundation of confident piano playing. You will learn posture, hand shape, timing, and coordination that let you make music with control and ease.
If you are new, Piano Play turns scattered practice into a clear routine. If you are returning, it reconnects touch and timing so pieces feel natural again.
In this guide, Piano Play appears in the opening sections 2–3 times to reinforce focus, then deepens into drills, troubleshooting, and measurable checkpoints.
What Is Piano Play?
Piano Play is a modular approach to piano technique that prioritizes healthy posture, relaxed hand mechanics, even tone, and steady rhythm.
It combines body setup, finger independence, scales and arpeggios, chord shapes, pedaling, and expressive control into short, repeatable sessions.
For posture and hand position, see the concise Yamaha posture guide, which aligns elbows near key height and promotes a relaxed, rounded hand shape (Yamaha posture guide: [usa.yamaha.com](https://usa.yamaha.com/products/contents/musical_instrument_guide/piano/play/play002.html)).
Why Master This Technique
- Faster progress. Clear routines prevent aimless playing and protect from strain.
- Better tone. Balanced posture and efficient motion produce an even sound across the keyboard.
- Reliable timing. Metronome work and rhythmic variants stabilize tempo under pressure.
- Musical freedom. Solid mechanics free attention for phrasing, dynamics, and expression.
Core Technique Breakdown
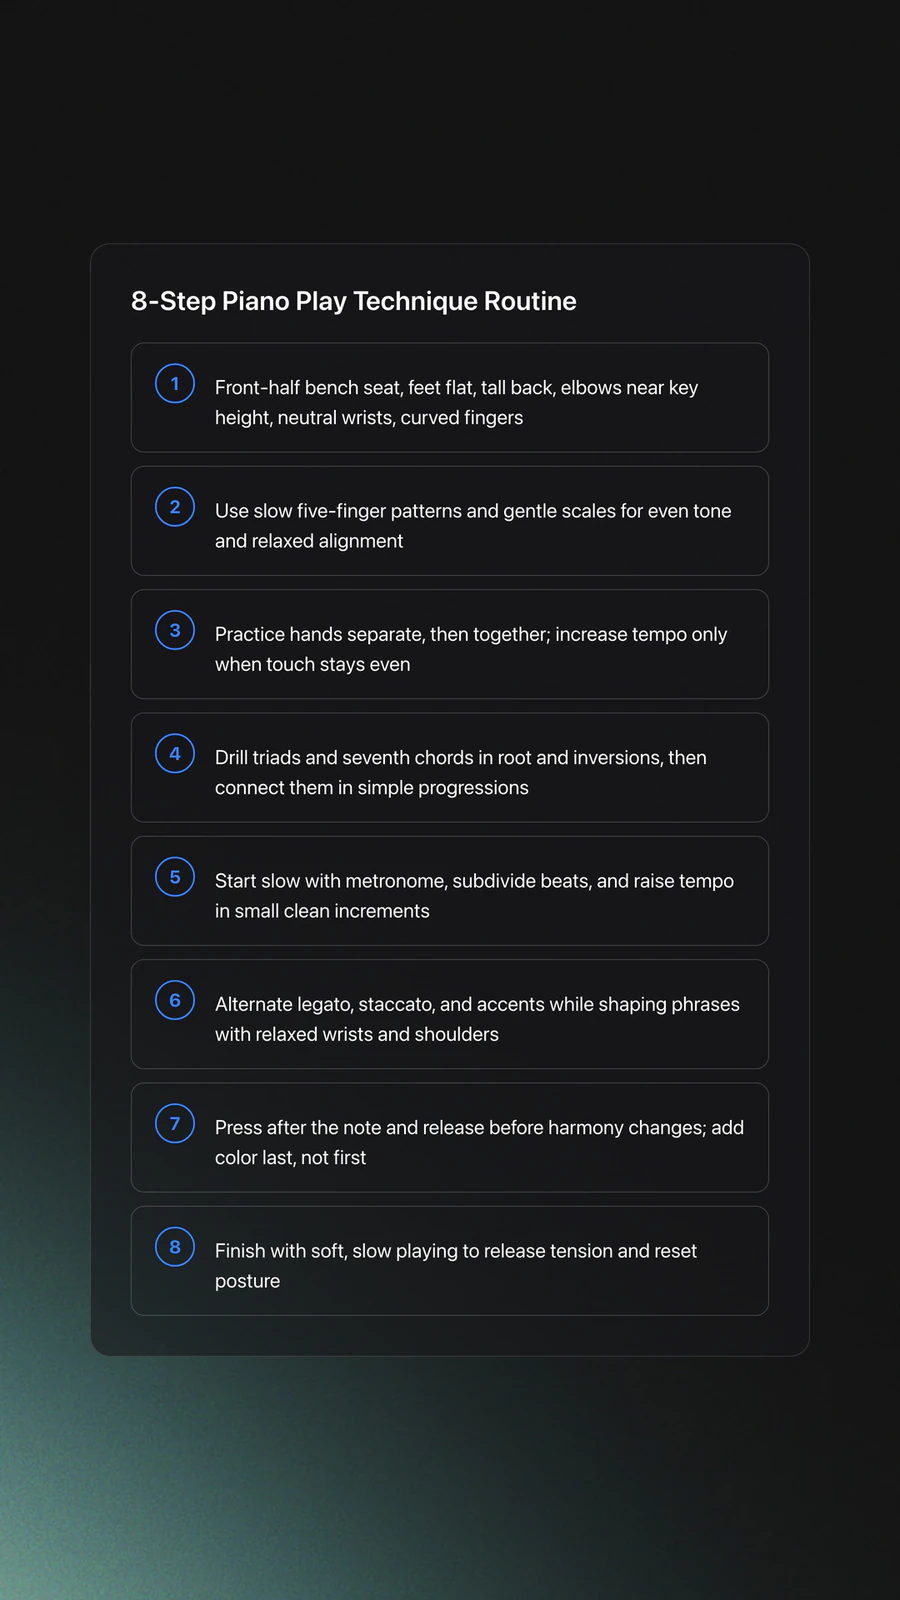
1) Setup. Sit on the front half of the bench. Feet flat. Back tall. Elbows close to key height. Wrists neutral, fingers curved like holding a small ball (Yamaha posture guide: [usa.yamaha.com](https://usa.yamaha.com/products/contents/musical_instrument_guide/piano/play/play002.html)).
2) Warm up. Play slow five-finger patterns and gentle scales to wake up touch and alignment. Avoid force. Aim for even tone.
3) Scales and arpeggios. Build finger independence, hand coordination, and key awareness. Their benefits for speed, evenness, and reading are well documented (Pianist Magazine on scales and arpeggios: [www.pianistmagazine.com](https://www.pianistmagazine.com/blogs/the-5-benefits-of-scales-and-arpeggios/)).
4) Harmony. Drill common triads and seventh chords in root and inversions. Voice with relaxed hands. Transition to simple progressions to connect theory and touch. See also work on chord progressions.
5) Timing. Practice with a metronome at slow tempos, then subdivide and increase speed in small steps. Use strategies that keep playing musical, not mechanical (Pianist Magazine metronome tips: [www.pianistmagazine.com](https://www.pianistmagazine.com/blogs/5-top-piano-tips-for-using-the-metronome/)).
6) Articulation and dynamics. Alternate legato, staccato, and accents across the same passages. Shape lines with breath-like phrasing. Keep wrists free, shoulders relaxed.
7) Pedal basics. Start with half notes at slow tempos. Press after the note, release just before harmony changes. Add color last, not first.
8) Cool down. End with soft, slow playing to release tension and reset posture. This supports healthy daily repetition.
| Step | Action | Key Point |
|---|---|---|
| 1 | Bench, feet, elbows, wrists | Neutral alignment reduces strain; elbows near key height |
| 2 | Five-finger patterns | Even tone before speed; relax between notes |
| 3 | Scales and arpeggios | Hands separate, then together; tempo rises only when even |
| 4 | Chord shapes | Root and inversions; connect shapes in progressions |
| 5 | Metronome work | Subdivide beats; raise 4–6 bpm when clean |
| 6 | Articulation and dynamics | Legato vs staccato; shape phrases, keep wrists free |
| 7 | Pedal basics | Change with harmony; avoid blur at slow tempo first |
| 8 | Cool down | Gentle playing to release tension, prepare next session |
Practice Drills
Short, focused sessions work best. Berklee emphasizes scales, arpeggios, and reading as a technical foundation across styles (Berklee overview of piano study: [college.berklee.edu](https://college.berklee.edu/piano/studying-piano)).
Through daily 15–30 minute sessions over several years, I found that hands-separate work plus dotted‑rhythm scale variants accelerate coordination faster than running pieces start to finish.
Use a metronome musically. Start slow, subdivide, and raise tempo only when the previous step is clean. This prevents robotic playing while building a reliable inner pulse (Pianist Magazine metronome tips: [www.pianistmagazine.com](https://www.pianistmagazine.com/blogs/5-top-piano-tips-for-using-the-metronome/)).
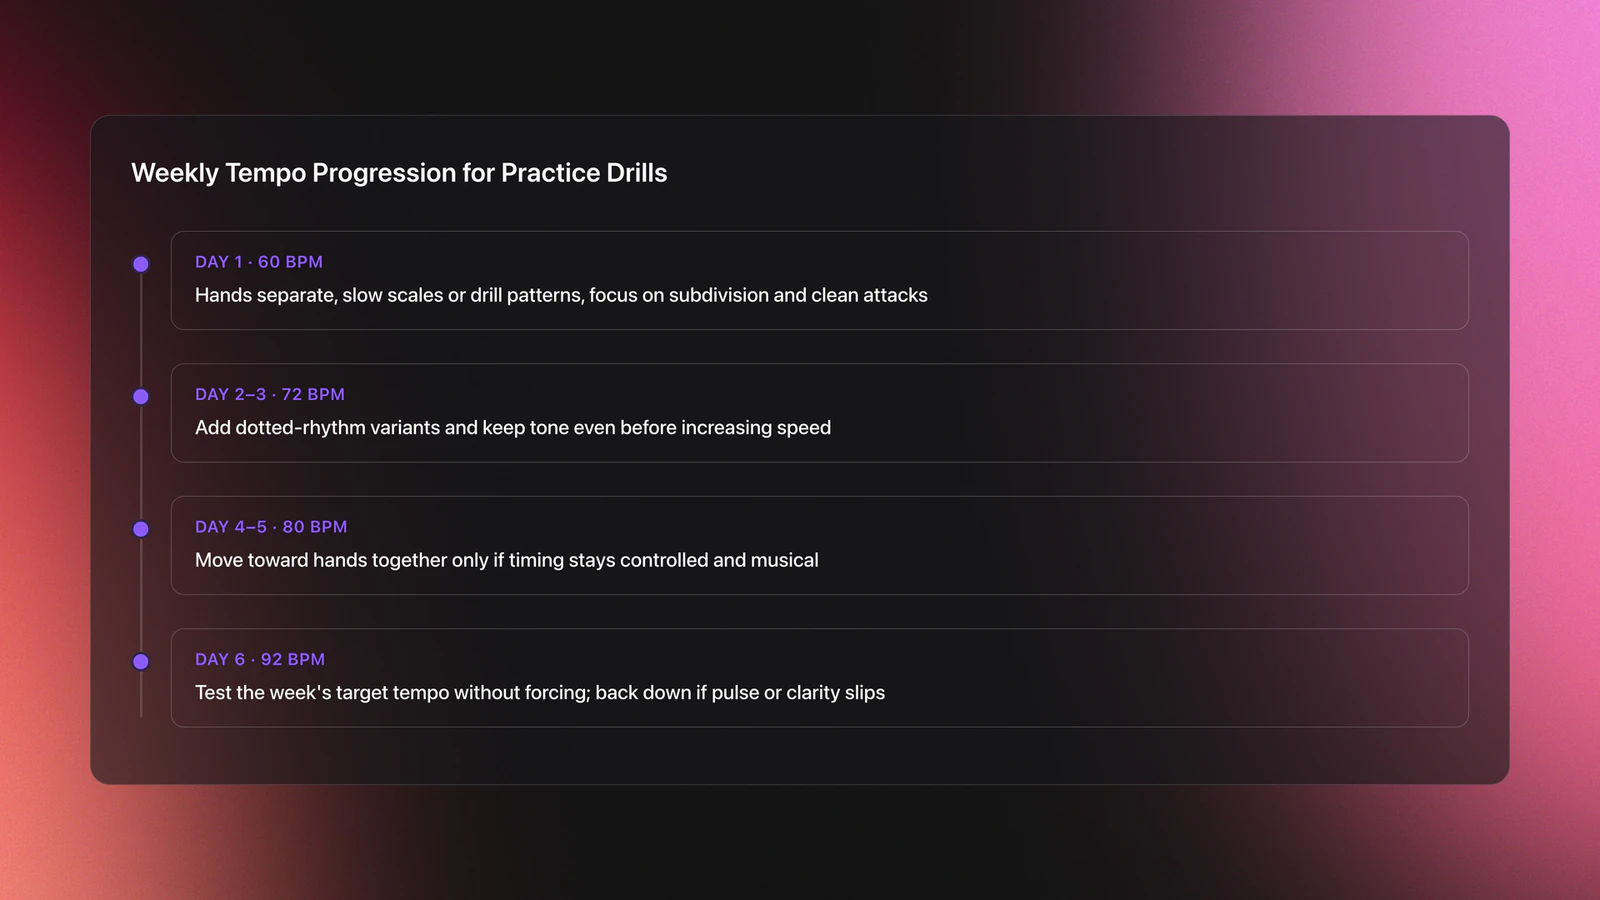
Track timing goals like 60, 72, 80, 92 bpm across a week. Tie rhythm control to solid timing and phrasing so performance stays steady under pressure.
Health and Safety
Use neutral wrists and relaxed shoulders. Keep elbows near key height. Yamaha’s guide illustrates the setup clearly (Yamaha posture guide: [usa.yamaha.com](https://usa.yamaha.com/products/contents/musical_instrument_guide/piano/play/play002.html)).
Schedule breaks. A healthy routine includes 3–5 minute pauses every 20–25 minutes and gradual load increases across days (BAPAM Return to Play schedule: [www.bapam.org.uk](https://www.bapam.org.uk/return-to-play/)).
Medical ergonomics sources note neutral wrists and slightly elevated elbows can reduce compression and maintain efficiency (Mount Sinai guidance on piano ergonomics: [physicians.mountsinai.org](https://physicians.mountsinai.org/news/playing-related-musculoskeletal-disorders-in-professional-musicians)).
Common Mistakes
| Mistake | Why It Happens | Solution |
|---|---|---|
| Bench too low or high | Wrist bends and shoulder tension | Adjust bench so elbows are near key height; wrists stay neutral |
| Skipping slow practice | Rushing to tempo bakes in errors | Lock accuracy first, then add 4–6 bpm when clean |
| Heavy hands and stiff wrists | Overgripping the keys | Use arm weight, rounded fingers, gentle lift between notes |
| Overpedaling and blur | Pedal hides uneven playing | Add pedal only after clean legato; change with harmony |
| Ignoring rest and discomfort | Pushing through fatigue | Insert short breaks and stop at pain; resume gradually |
Equipment and Setup
Use an adjustable bench and set it so your elbows align with the keys. Keep feet flat for stability. A metronome or app supports accurate tempo work.
Digital pianos with graded hammer action develop touch better than lightweight keyboards. Place a mirror or camera to check posture during practice.
If reading from paper, put the stand at eye level to avoid neck strain. Keep lighting even to reduce squinting and shoulder tension.
Progression Path
Week 1: posture, C major/A minor scales, chord shells, 40–60 bpm subdivision.
Week 2: add G and F major scales, triad inversions, dotted‑rhythm scale variants, simple repertoire looped in 2–4 bar sections.
Weeks 3–4: expand keys, two‑octave scales hands together at 72–92 bpm, pedaling on slow chord changes, dynamic contrasts.
Pair technique with sight reading so patterns transfer to music. See build sight reading.
The visual way to organize your DJ library
Tag tracks by vibe. See everything at once. Export to any DJ software.
14-day free trial. Full access, no strings attached.
or see how it works
Frequently Asked Questions

Hey, it's Ben Modigell 👋
I DJ and produce as so I so — downtempo, minimal, dub house, tech house, and techno (releases on Spotify and SoundCloud, links above). Everything I write here comes from my own gigs, studio sessions, and library cleanups: the rules I follow, the failure modes I've actually hit, and the workflow I use when nobody's watching. If a technique didn't earn its place in my own sets, it doesn't make it into a tutorial.